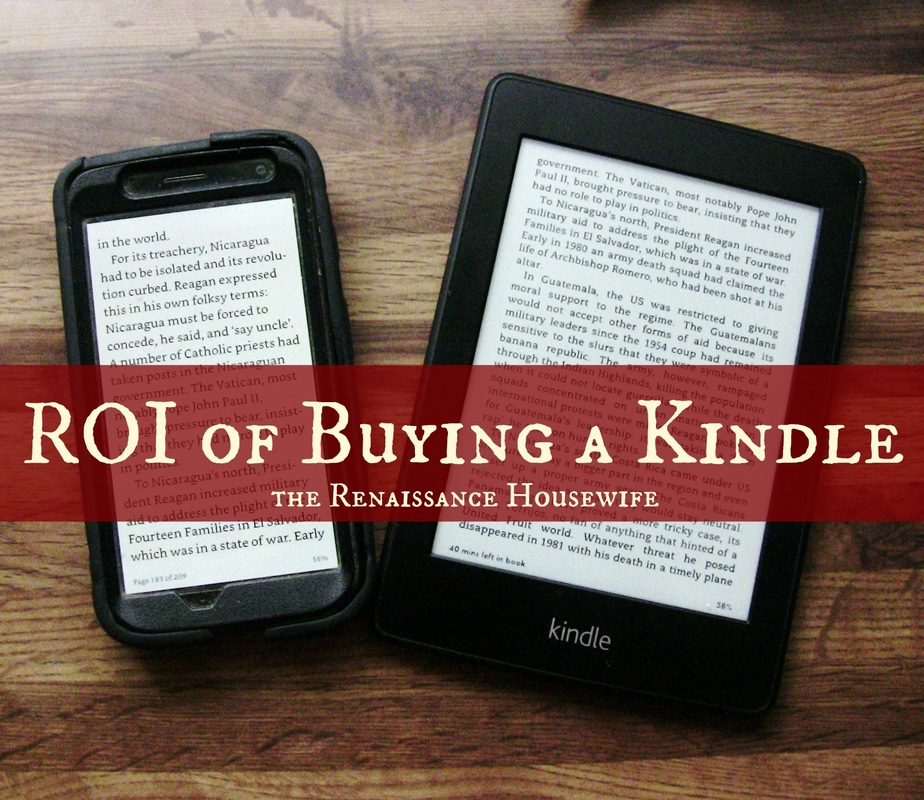
the Renaissance Housewife
  • Home
  • Topics
    • Saving >
      • Kitchen >
        • Food >
          • Recipes
      • Bath & Laundry
      • Medicine Cabinet
      • Office
      • Electricity
      • Gardening
      • Foraging
      • Animals
      • Weekly F. A.'s
      • Printables & Downloads
    • Earning
    • Investing
  • Books
  • About
    • RH Recommends
    • Newsletter & Updates
    • Travel
    • Beta Readers
    • Legal Stuff

ROI of Buying a Kindle

8/19/2016

0 Comments

 
Picture
My Kindle Story

I have been a Kindle Paperwhite owner for three years. When I bought the Kindle, it was with the intention of saving money on 1) newly released books, and 2) reference books or text books. As you probably know, most ebooks on Amazon have a top price of $9.99. Oftentimes, this is cheaper than buying a paperback or hardcover version.

One of the first ebooks I bought was Cure Tooth Decay by Ramiel Nagel. At the time, I was burnt out by using the library and wanted to just buy the book. I looked all over for a cheap used copy (even on sites like Paperback Swap which I had been using to get rid of books not worth enough to sell on Amazon), but even the used copies  were only a few dollars cheaper than the list price of $26.97 (+$3.99 for shipping).

After searching the used market for a little while, I noticed that the ebook price was only $9.99. Too bad I didn't have a Kindle! I could be saving 50% on this book. What if I wanted to buy more books, and saved $10.00 or more every time I bought one? The savings alone might cover the cost of purchasing a Kindle.

A few days later, I discovered and downloaded Amazon's free desktop Kindle app. I bought the book I had been looking at, and decided that I liked reading ebooks. When I had been reading ebooks on my desktop for almost a year, I started to want a Kindle. After some research and asking around, I chose to buy the Kindle Paperwhite. It cost about $119.00 at the time.

​
Was My Kindle Worth the Investment?

If I saved $10.00 for every book I bought on the Kindle, it would pay itself off after 11 books. Though I certainly purchased 11 books within a year, it's doubtful if I truly saved money by purchasing ebooks, let alone the Kindle. In 2012 I spent $99.63 on ebooks. In June of 2013 I bought the Kindle device, and spent $119.21 that year on ebooks. Woah! I realized then how easy it was to spend money on ebooks, and decided to change my book buying strategy. During the last three years I've only spent $41.62... an average of $13.87 per year on Kindle books.

Altogether, in the past four years I've spent $260.46 on ebooks (most of which I probably could have checked out at the library), in addition to the $119.00 Kindle itself. One has to wonder if spending $380.00 on non-essentials is really an investment.

The reason that I don't think Kindles are a good investment is because, after you buy them, ebooks have no value. You cannot resell an ebook. You cannot even lend it to a friend. So of the $260.46 that I spent on ebooks, I will not have a single dollar of that come back to me. You can resell the Kindle, but only at half the price you paid for it. 


A Better "Investment"


Four years later, I still enjoy using my Kindle but it is much slower than it used to be. I see now that anyone in the market for a Kindle Paperwhite can get one on Ebay for $50.00. And there is one more new development that might influence your decision to buy a Kindle.

Along with the free desktop app, Amazon offers an app for your smart phone. This apph essentially turns your phone into a Kindle; backlight, adjustable letter sizing, highlighting and all. The Kindle app also offers social media sharing, which my old Kindle Paperwhite does not (I'm not sure if the new ones have been updated). 

In addition to being completely free, the Kindle phone app allows you to take your books with you anywhere without carrying another device in your purse. And yes, I can turn the pages a lot faster on my phone than on my actual Kindle device.


How to Get the Most Out of Your Kindle

Whether you have an actual e-reader or just the phone app, there are ways to get the benefits of reading ebooks without spending $260.00 on things that have no value after you've bought them. Here are some of my favorite frugal Kindle hacks.

1. Only buy free books. Sometimes Amazon authors will run a promotion on their book and offer it for free for one day only. I have done this before as an author. Every day there are new free ebooks available. You may be able to download several high-quality books this way.

There are also hundreds of free books out there that are not high-quality, but still worth reading. Some books like this that I have bought include cook books, exercise books, or short stories.

Any book written before 1923 is in the public domain. Most public domain works are available for free on Amazon. This includes everything from great classics and technical writings to any obscure old book you might find at an antique shop. When I was a kid, we had an old book about the "Galveston Horror", a hurricane that flattened the city of Galveston, TX in 1900. Sure enough, just the other day I found the exact same book on Amazon Kindle for free. There is no reason to buy these old books and keep them around (especially if it is a one-time read) when you can get a free, legible, non-fragile and no-pages-missing copy on your phone.

Lastly, any .epub file can be loaded onto your Kindle/app and read as an ebook. These files can come from anywhere, not just the Kindle store. Recently I found some historical files from the Michigan Pioneer Society to use for some research I've been doing. Instead of spending hours in front of the computer, I simply downloaded the .epub file onto my Kindle. Now I can do my research in bed, in the car, or outside on a warm summer day.

2. Use the Kindle for its translation capabilities. You will have to purchase a Spanish (or whatever language you are learning) dictionary, but after that you can download free Spanish books to practice with. This is a whole lot easier than reading a physical Spanish book and having to look up every word you don't know in a physical Spanish dictionary.


Alternatives to Buying Ebooks

Nowadays, if there is a book I want to read that I can't find for free, I will usually get it from my local library. Most of the books I like are not stocked at our local library, but I can order them through the interloan system. For every one book I get via interloan, I try to check out two books off the shelves at our library. The most efficient way to get your reading done would be to ONLY order interloan books and not mess around with checking out books you didn't plan on reading in the first place. However, I tried that with my hometown  library several years ago and it really ticked off one of the librarians. After receiving several rude comments from her (one that I actually confronted her about), I got discouraged and just started buying books I wanted instead. 

This time around, I am really trying to have a good relationship with our local librarian. I am not sure if the interloan books are actually more work, or if the rude librarian just needed someone to blame for her disappointing life. Whatever the case, not using the library cost me literally hundreds of dollars. So I just thought I'd throw that caution out there to anyone who has just discovered the interloan system and is going crazy ordering all sorts of books. Keep the librarians happy.

If there is a newer release that the interloan library does not have, I purchase a physical copy from Amazon. Though it will probably lose some value by the time I am done with it, the book will not lose ALL of its value. I will still be able to resell it, or at least give it away to a friend.

Conclusion

Though I positioned this as an ROI article, the reality is that buying a Kindle is not an investment like one might think. Technology has developed to the point where this "investment" has become a toy for reading pleasure. A better investment is to download the Kindle app on your cell phone for free books, and to purchase physical books that actually have resale value. To be fair, I still do pay money for a select number of Kindle books every year, but those are usually very niche topic books by independent authors. Last year, for example, I purchased Early Retirement Extreme by a blogger named Jacob Lund Fisker. It was not available through the interloan system, and the Kindle book was $9.00 cheaper than the paperback, after the cost of shipping. This year I purchased an ebook when we were on vacation. I had lots of time to read, but there was not a library where we were staying, and I wanted to read the book before we left (it was about the history of banana plantations... not something that would be as interesting when I got home).

Buying books can get complicated when there are so many resources available. However, when we buy the right books from the right place (or get them for FREE from the right place), spending can be cut to almost nothing. And books sure provide a great return on an investment of almost nothing!

Til next time, 
-Bethany
0 Comments

Frugal Accomplishments This Week

8/1/2016

0 Comments

 
Picture
July is officially over! And I'm not too sad to see it go, either.

1. Picked garlic, green peppers, broccoli and green beans out of the garden.

2. Made laundry soap.

3. Line dried two loads of laundry.

4. Sold four dozen eggs.

5. We went on a frugal date. I have been trying to do more picnics, because it is so nice out during the evenings. This week we went to a free community concert. I packed some homemade ham and cheese wraps, along with granola bars from the bent 'n' dent store. 

6. After our date, we went to Walmart to pick up a few things and saw that men's shorts were on sale. I have a really hard time finding Hubs' size (32/32) at garage sales and thrift stores, so we bought three pairs for him. 

7. Made a batch of goat's milk soap.
 
8. Picked some sunflowers out of the garden for our kitchen table.
Picture
9. Continued to work on my book. This week I found two older books to use for research; one called Quick Thrifty Cooking, and also The Frugal Gourmet. I have been looking for the latter book at our library for months, thinking I saw it there. Finally I just asked for it, and as it turns out they didn't even have a copy. By chance, my mom found it at a thrift store and thought I'd be interested. How cool is that?

In addition to research, I also worked on a section about fats & oils, and looked for possible cover designers. 

10. Cooked a roast in the crock pot. Unfortunately our schedules got messed up and we didn't get to eat it that night, but I put it in the fridge for lunch the next day. When I went to take it out, I noticed that much of the fat had solidified to the top. I picked it off of the broth and saved it to use in soap.

11. Walgreens had a 75% off sale on photo books this week. I decided to take advantage of it and order one with pictures from our honeymoon. Hubs and I are not "picture people", so we actually have very few physical pictures of our wedding or honeymoon. In fact, all of the honeymoon photos are from his cell phone, so I thought it would be best to put them in a book instead of printing them individually. For $8.00, I thought the book turned out pretty well. 

I am going to sign up for Walmart and RiteAid email updates as well, and wait for a sale on their photo books. I am curious as to the quality of these stores as opposed to companies like Shutterfly or Snapfish. Eventually I would like to make books from all of our travels, in addition to a book of wedding photos. There is no rush, though. Most of our travel photos are from the cell phone, so I will use the travel photos to experiment with different photo book companies. Then I'll chose the best company to do our wedding pictures.

Goals for Next Week:

1. Order lye and vanillin for soap.
2. Sign up for Walmart, Rite Aid, Shutterfly and Snapfish emails.
3. Continue weeding/deforesting the garden.
4. Post garden and hobby farm updates on blog.
0 Comments

Saving on Electricity, Part 6: Extreme Heating

7/28/2016

1 Comment

 
Picture
​Heating and cooling costs are a big part of your electricity bill.  Today we will look extreme ways to save on electrical heating costs.

Water Heater Hacks

When we moved into our present home, there was no working water heater.  We happened to still have a 80-gallon electric commercial water left from our last business. We like to use what we, have so we installed it.  I had already been looking for ways to save on our electric bill and I knew that this water heater, being so large, would cost more money to keep at a constant temperature.  So we did an experiment.

We turned it on until the temperature reached 140 degrees Fahrenheit out of the faucet.  Then we turned it off by turning off the breaker (much harder to do with a propane water heater; it may not be worth it because propane is more efficient, and it could be dangerous if you’re not familiar with lighting procedures and turning off the gas). After turning it off, we kept track of how long our hot water lasted.  Depending on the day and usage, we could get 2-3 days out of turning it on for three hours.  In three hours, the tank temperature reached 140 degrees. The water gradually cooled, but I didn’t need 140 degree water ALL THE TIME. This method still works well for us, and now we do it regularly. 

I thought turning our water heater on and off was quite extreme (like, none of my friends do this!) when the following happened...

A Light Bulb Moment


I was watering flowers in a near drought one day, when I had to wait for cold water because the water out of the hose was so stinking hot.  At the same time, I was waiting till off peak hours to turn the water heater on so I could do my dishes (didn’t quite get it done before 11:00 am).  And it hit me!  I could use this hot water to do my dishes…. this free hot water!  And by hot I mean HOT.  Getting out my thermometer I measure that water at 135 degrees F, hotter than most people set their water heaters at. What else could I use this water for?

Boy #3 was thinking the same thing a few hours later, because the next time I looked out the window I saw him with some shampoo and the hose over his head.  The problem was that the water was too hot, then instantly too cold.  Not to mention, holding the shampoo and the hose while trying to wash your hair was a bit hard.

Just for fun, we measured the temperature at different times of day, calculated how many gallons we got from 320 feet of hose.  In 3 - 4 hrs. (summer time) we can get at least 4 gallons of 140 degree water* to use for our shower.  We decided that if it was a hotter day, we could add some cold water to get the temperature we wanted. We thought up different ways we could make a shower, and then consulted Youtube searching for outdoor showers.  A couple of Youtube videos later, we had put together our own version using what we had around the house.

First, we found a clean five gallon bucket (this one might have held paint at one time).  We took a rope and attached it to the bucket handle.  Boy #3 added a clip to the end of the rope.  Ruining a few buckets by making too many holes, we finally drilled just 10 holes in the bottom of a bucket and found that each gallon gives us one minute of shower time.
Picture
​Oh, joy! Do you see the smile on his face?  This shower was  two minutes longer than the navy shower (get wet, turn water off, lather up, rinse off) that we had been experimenting with in the house. Extra time in the makeshift shower!

Are we going to do this all the time? No.  Will you see my family in a line outside on Sunday morning waiting their turn for a shower by the tree?  No.  Does it gives us more choices?  Yes, it does.  Have my children learned a new way of doing something?  Yes, they have!  And boy, was it fun working together on this project!

Other Heat-Saving Tips

Speaking of showers – a person can take a cold shower instead of a hot one.  I read about the health benefits of cold showers** in Tim Ferris’s book, The Four Hour Body.  I tried it….once.  I don’t know if I felt healthier, but I did feel more confident.  (Like, if I can do this, I can do anything).

Lastly, go south in the winter to a warmer climate.  Seriously, we’ve done this. Sometimes you can rent a home or condo (with utilities included) for less than the cost of utilities (fuel oil or propane and electricity) during the winter months in colder parts of the country.  As more jobs become location independent, this may work you. 

Next Steps

What is next for us? My husband has started to become interested in a solar hot water system and penciled out a plan to heat water using the sun, through a series of hoses connected to our hot water heater.  I’m very excited about this, as I’ve read that solar hot water systems cost around $5,000 and almost eliminate the need to pay for hot water.  I am interested to see how this works with our mid-west winters.

Next time we’ll talk about extreme cooling!

*A note of caution: Legionaries disease is a rare type of pneumonia that can infect immune suppressed people, and is often linked to water.  In my research, I’ve learned the bacteria Legionella is found in warm stagnant water (that is, water that has been sitting for days on end). The bacteria are dormant below 68 degrees and do not survive above 140°C.  I don’t worry about the legionella bacteria, as our water is being constantly moved.  We kill any bacteria by heating the hot water system to 140 degrees at least once a week and we are all pretty healthy. But as with everything you read, you should do your own research and decide what will work best for your family.

**Note from Bethany: I, too, have read and experienced the fact that hot water dries out your skin. In addition, it is recommend that curly- or wavy-haired people at least rinse (if not wash) their hair in cool water because it helps keep the curls tight and prevent them from getting frizzy.
1 Comment

Saving on Electricity, Part 5

7/22/2016

2 Comments

 
Picture
So far in this series, we’ve gone over:

1. How to Read your Electric Meter
2. Reading your Bill (How Much Your Kilowatts Cost You)
3. Measuring Electricity Inside the Home
4. Making Choices with What You Know (How Much Energy Does that Dryer Use)?

Now we’ll look at little tips that can save you BIG money.

1. Change your light bulbs to CFL or LEDs.
  This is an old tip and I’m hoping that you’ve already switched the light bulbs in your house. CFL are now relatively inexpensive as compared to when they first came out.  LED on the other hand can still be quite costly. I have a few LED and have bought them on sale.  Mostly we use CFL.  There is no reason to be using a 60 watt regular light bulb where a 13 Watt CFL will do.  At first I did not like the color of the light they put out.  But then I learned I had to look carefully at the label to see what I was buying.  I like a soft yellow light (not blue old style florescent light).  Some home improvement stores have displays that show the light the different color bulbs put out, which is helpful.  For cost comparison if I have 20 – 60 watt bulbs on 8 hours a day it will cost me approx.. $1.24.  By changing these to 20 – 13 watt bulbs I save .96 a day or $350.00 a year. 

​2. Sign up for Income or Elderly assistance if your electric company has it.  Most electric companies have programs that reduce the cost of your electric bill if you’re over 65 (sometimes 60), or if your annual household income is under a certain amount.  Whether or not you like these programs (since when is 60 old?), we all pay into these programs involuntarily.  Look at the bill below. You can see an item called Low Income Assist Fund that is added to the bill.  Each month we are contributing to the fund to support these programs. You will also see a $7.00 credit under income assistance. 
Picture
Yes, this year the company determined with the amount of people in our family and our annual income we should have a monthly credit.  I won’t argue with them.  $7.00 a month is $84.00 a year! For us, that is a free month of electricity.  And just for being a certain age you can have a credit of $3.50 a month, or $42.00 a year!  Can you do both?  Not with our company; it is one or the other.  Call your electric company or do a quick search on their website to see if there is a program that you qualify for.  

3.    Check your bill for mistakes.  Your electric company makes mistakes.  The first bill I received after changing my time of use rate they flipped the off and on peak numbers!  Yes, it showed 86% of my usage was during a peak time!  Check your bill and understand it so that if an error is made you can have it corrected.  Finding this error saved me $23.00 this year.

4.    Chest freezers are more efficient than upright freezers by almost 60 %.  My chest freezer would cost $2.34 more a month- $28.00 a year- if it were an upright.  Also, a chest freezer costs less money to buy.  In the long run you are saving money on energy AND the original purchase price.

5.    In cold weather, dress warmer; don’t turn the heat up. Add a sweater, socks and shoes. Add extra heat to a room, not the whole house. As an added bonus everyone will gather together to be in that room. Before bedtime, turn on an electric blanket for 30 minutes to warm your bed. Unplug it before you climb in. From there on out you will generate your own heat.  Don’t leave it plugged in all night! The difference for one bed for 30 min. instead of 8 hours is .20.  But for us, 6 electric blankets at 30 min. each will cost $.06 a day or $5.90 a year.  Saving us $113.40 a year (calculated at 90 days a year) by only having them on for 30 min. instead of 8 hours.

6.    In hot weather, do your best not to turn on the air conditioner. Home with the kids? Cool off in the afternoon in a pool, county or state park lake, city spray park, or your own sprinkler.  Go to the library in the afternoon or set up a cozy spot to read or play games in the basement (which is naturally cooler than above-ground levels of a house).  Keeping air conditioning off as compared to running it 3 hours a day for just 90 days out of the year saves us $122.85 per year. 

7.    Continue to educate yourself on electricity usage and your savings are infinite.   Here is one great site: www.michealbluejay.com. 

Next time we’ll talk about extreme ways (at least for we Americans) to save on heating and cooling.
2 Comments

Frugal Accomplishments This Week

7/11/2016

0 Comments

 
Picture
Last week was super productive. We didn't have a lot going on, so I got to spend more time in the house and garden.

1. Made a vase arrangement for the table using lilies and ferns from the garden.

2. Harvested over five quarts of berries, 1 quart of green beans, lettuce and chamomile from the garden. I also harvested a bowl of Japanese beetles for my chickens.

In order to hand-pick the beetles, fill a container 75% full of water and add a drop of dish soap. Then go out early in the morning when the bugs are still sleeping. My beetles LOVE the raspberry patch, so that is where I collect. If they are still tired, you can usually brush or shake the bugs off into the bowl of water. After collecting, I leave the bugs for an hour or two until I know they have all died. Then I feed them to the chickens.

This accomplishes two things. First it gets the bugs off the raspberries without any chemicals, and second it feeds the chickens a nice protein-filled snack. It only takes 15-20 minutes in the morning to do this.

3. Mounted/framed some paintings from Honduras and Guatemala. Hubs measured and built frames for the paintings out of scrap lumber, and then I helped him stretch and staple the canvas over each frame. They turned out very nice.
Picture
4. Made cheese.
​

5. Went to garage sales! I ended up spending about $48.00, but $24.00 of that was on canning jars. I paid $0.33 on the jars, which were half-pint and pint sized. This price was only 50% off retail for the normal half-pints that I bought, but I also purchased an equal amount of specialty jars that cost $1.00 or more new. So those jars were 75%+ off retail. I will use the specialty jars for farmers market stuff and gifts.
Picture

In addition to the jars, I also bought some vintage items for selling on Ebay/Etsy, several candles, lamp oil, an electricity timer, a belt, two baskets, a like-new pair of flip flops, a spatula, three small rubbermaid food containers with lids (I needed more of that size, plus they had lids!), a necklace, a clothes drying rack, a dish drainer (the one I have doesn't fit in the sink and takes up a lot of counter space when not in use), a pizza pan, two cookie sheets, brand new heart-shaped cookie cutters, baby-themed stamps for making cards, a lined notebook/journal, a folder/binder for storing coupons, a box of sewing notions (thread, buttons, snaps, velcro, etc.) and several items for the "prize box" I keep for my piano students.


My Garage Sale Strategy
​It can be easy to just fill your house with garage sale junk. However, there are some things you can do to prevent useless garage sale buildup in your home.

1) Carefully select housewares for the purpose of upgrading your lifestyle. These things should be specific items you are looking for, not impulse purchases. For example, I don't go around collecting dish drainers. I had my eye on one at Walmart, and actually considered buying it. However, by waiting for a garage sale I saved about 70% retail price.

2) Buy tools that you will use to make stuff or save money with. The stampers, clothes drying rack and meat slicer are all things I hope to save money by using.

3) Buy things to sell. That way you can make money with them AND get rid of them! You can also sell tools that you buy and end up not using.

4) Buy supplies and consumables. Things like sewing notions or lamp oil are items that I may have bought anyway and will eventually get used up. The sewing box was $1.00 and included several different thread colors. Building up a supply of thread through garage sales and then matching those threads to your project is a lot cheaper than starting a project and buying new thread to match exactly. In fact, using steeply discounted supplies is essential to frugal sewing. If you are making a skirt and spend $1.50 on thread (and that is the cheap kind), you've already spent half of what a Goodwill skirt would cost.

5) Don't buy something you already have. The problem with garage sales (and sales in general) is that people buy something just because it's a good deal. They don't have a plan for the item, so it ends up sitting in the garage or barn or attic until THEY have a garage sale. In the mean time, the item has only been taking up space and depreciating in value.

Picture
6. Sold 2 dozen eggs.

7. Earned $53.04 at the farmers market. Technically I am taking the months of July and August off, but this Saturday Hubs was busy and I thought I'd take the opportunity to try out a different Saturday market in my home town. This one was smaller, but also had smaller fees and was close by. I was curious to see how things would work out. I priced my baked goods a little lower than I normally do. As it turns out, they were still a little bit higher than the other bakers, but people bought anyway.

At the end of the day, I actually made more money this week at a small market than I did either week of June ($47.06 and $44.36 respectively) at the large market. Though I marked my prices down and didn't sell as much stuff on Saturday, the $15 less in booth fee and $1 less in gas money allowed my net profit to be more. Who knew? Now I can plan on doing the larger market during the month of May (before the small market opens), and then move to the smaller market in June. From June-August I will probably only sell once a month. $53.00 is more than enough to cover monthly summer feed costs for the animals.

The only thing I didn't like about my hometown market was selling (or not selling) to people I grew up with. That was a little weird. I felt like some of the people I knew were critiquing my stuff. I wondered if they thought my products were stupid or overpriced or bad. "Oh, there's Bethany, trying to sell a bunch of stuff she made. I know her- she's not a REAL baker/soap-maker/author/farmer. Let me look at this... nope, totally not legit. I'll bet she doesn't even make any money at this. What a waste of time. What a loser. She should just go get a real job like all the rest of us."

We tend to take strangers more seriously than friends (especially the ones we grew up with), so my suspicions/fears were probably correct in some cases. There will always be a few people who think you are "not legit" just because you grew up down the street. However, the bottom line is that I did make more money and it was easier and less stressful than the large market. So, I'll probably sell there again.

Unfortunately, on the way home one of my tires blew. So, my market car is out of commission until Hubs finds another tire. Good thing I'm not doing market again for a while!
Picture
​8. Separated Adi from her kids. Now we are milking twice a day and keeping twice as much milk for ourselves. Last year I didn't have any kids from Adi, so milk from her was abundant. Life with [goat] kids has been... interesting. One challenge we were not prepared to deal with was their size. If goats are escape artists, baby goats are master escape artists. Because they are so small, they can not only squeeze through tiny holes, but also propel themselves over fences and onto barn roofs. We've managed to separate them from the buck and their mother, but they are still squeezing/jumping into the chicken corner and eating chicken feed on the sly. Oh dear.

Anyhow, while we were gone for essentially two weeks (first for Honduras, then across the country for a funeral), Adi's milk production dropped to 1 1/2 cups per day. I believe this is because we left the kids on her instead of separating them and milking her (to make chores easier on the animal babysitters), and she naturally started to wean them. So during that time she went from 3 cups per milking to 1.5 cups per milking. Last year it took months, not weeks, for her to go down like that.

Now that we've separated her from the kids and are milking twice a day regularly, I'm hoping that her production will stay over 3 cups per day. 

Goals for Next Week:

1. Make soaps.
2. Photograph aprons for Etsy.
3. Continue to harvest garden produce.

Til next time,
-Bethany
0 Comments

Saving on Electricity, Part 3

7/6/2016

0 Comments

 
Picture
​Today we are going over different ways to measure your electricity inside the home.  Hopefully you know where your meter is and are tracking your daily or bi-daily usage.  You know how much each kilowatt is costing you and you’re considering time of use rates. 

What's Taking the Juice?

​You can find out what is using electricity in your home, item by item, in a couple different ways.  The first way is to simply unplug every in your home and then plug in one thing and a time and record it for an hour.  Some items are easy to unplug like the fridge and freezer (yes, these can be unplugged for a bit – just do not open them during the time they are unplugged and remember to plug them back in – set an alert on your phone).  Others, like the stove and water heater (if electric – do not turn off a gas water heaters or stoves – we are measuring electric usage) need to be shut off at the circuit panel. 

Your circuit panel looks like this:   
Picture
Box closed
Picture
Box opened
 It should be labeled so you can see which appliance is which.  Simply switch the stove and water heater to the off position (or opposite of what it currently is).  You will know if you forget to turn these back on, because after a while your water will be cold and the stove won’t work. 

Consider which appliance you will test first.  Maybe start with the stove.  I have unplugged everything but the stove and am now testing how many kilowatts the stove will use when I bake something.  I record the number that is showing on my meter.  Turn it on, let it run for an hour – bake something – you don’t want to waste this use of electricity!  Read your meter again.  The difference in the two numbers will tell you how much per hour the oven uses.  I can do this with the stove top burners as well.  When I tested my oven, it used 5 kwh per hour. 

I can do this with the dryer as well.  Before, my meter read 1297, and after it was 1301 (a difference of 4 kwh).  I had it running for an hour on high.
 
Option #2: Kill a Watt

The second way to measure is with an electric meter.  I got mine on Amazon years ago – when my electric bill was running in the $1000.00 month range.  This one is appropriately called the Kill A Watt.
Picture
P3 P4400 Kill A Watt Electricity Usage Monitor by P3 
 
I love this little device.  It has been worth my investment to have one.  When something new comes into the house, I can easily determine how it is going to increase my electrical bill. 

You don’t even have to unplug the rest of your home.  You just plug it in and then plug in your appliance into the device.  At any time you can just push a button to see how much it is using.  I like to leave mine on for 24 hours – especially the fridge, because it turns on and off so much.

For less than $20.00 this little device is handy.  I’ve also heard that some libraries carry them for checkout.  What a cool idea is that?!? When I’ve had friends who complain (err.. express concern) about their bill, I’ve lent it to them.  I’ve bought them for Christmas presents.  Can you tell I love these little devices?

Option #3: Wireless Home Electricity Monitor

​You can also invest hundreds of dollars into whole house electric use monitors that you can check online at home or anywhere.
Picture
Eyedro EHWEM1 Wireless Home Electricity Monitor, Wireless Internet Connection by Eyedro 
 
​These are really neat as they tell which rooms in the house are costing you the most in real time.  I drool over them but haven’t justified the cost yet and they do take somewhat of a professional to hook them into your circuit panel.  Some of them even have a reoccurring monthly charge.  When the price becomes less I may consider it.


Get a Kill a Watt – or borrow one, or unplug and record the meter while you test a specific item.  If you can’t do everything in the house, pick one or two things. Anything that heats or cools is a great place to start. Next week, I’ll go over what I discovered was using the most electricity in my house. And we'll discuss the choices you and I can make, with the information we have, to slash our electric bill. ​​
0 Comments

Saving on Electricity, Part 2

6/30/2016

0 Comments

 
Picture
This is a continuation of last week's guest post, Saving On Electricity, Part 1.

I hope that you know where your electrical meter is and are now recording daily or bi-daily readings.   Today we’ll look over an electric bill to see how much each kilowatt is costing you and establish your baseline usage.  We will also discuss different types of billing.

Cost Per Kilowatt Hour
If you have it, pull out your most recent electric bill.  If it is not available you may have to spend some time on the telephone or internet getting the information you need. 

Before doing the math, take a good look at your electric bill.  Our current energy supplier provides the following information for us on each bill.  Our last supplier did not, and we had to figure it out ourselves.  
Picture
Some electric companies will do all the work for you and supply this information right on the bill.
You’ll want to know:
1) How many kilowatts I used last month:  _________
2) How many days were in the billing period: ___________
3) Total cost of electric bill: __________

Take the number of total kilowatts (1) and divide it by the number of days in the billing period (2).  This is how many kilowatts you used each day last month.  Now take the total cost of the electric bill (3) and divide it by the total kilowatts you used last month.  This is your price per kilowatt.  To establish your price per day, take the total amount of the bill and divide it by the number of days in the billing period.

What is your price per kilowatt? _______
What is your price per day?________
How many kilowatts do you use a day?______
How many kilowatts do you use a month?______

Great job!  Establishing where you are at now will make it easier to see how much you’re saving each day!

"Standard Rate" Vs. "Time of Use" Bills
Now we are going to look at two different bills,   a Standard Rate bill and a Time of Use bill.

Standard Rate Bill
Picture
You’ll notice at the top of this bill under “energy” each kilowatt is actually costing .092235 (round to 9 cents).  The energy cost of .09 per kilowatt is the standard rate.  For the summer months of June – September, my rate increases if I go over 600 kilowatts per month.  So if I were on the standard rate system, my goal would be to stay under 600 kwh per month.  Your company may differ, but find out!

 Because there are so many cost factors added to your electrical bill each month (system access, distribution, power plant securitization, and more) I like to look at the total of the entire bill to figure cost of kilowatt.  By the time all the charges are added the kilowatt cost is .24 per kilowatt on this bill. 
 
Time Of Use Bill

In researching different ways I could lower my electric bill, I came across Time of Use rate.  I had always heard that doing your laundry or cooking in the off times would help lower the bill.  I never understood this, because my whole life we had always had standard rate.  There were no "on and off" times.  It was a mystery to me. Was the Time of Use rate even available for our family?

I googled my electric company name with the words “Time of Use”, and was directed to just a couple paragraphs that explained the differences in each rate; standard and time of use.  The website said, “You no longer have to qualify to use time of day rate. Anyone is eligible”. I’m guessing prior to this, one had to use a certain amount of energy to qualify.  I started getting excited.

I called the company.  I told them I’d like to try the Time of Use rate.  The representative told me, based on my current usage, that it would only save us $5.00 a month.  $5.00 a month is $5.00 a month.  I told her I’d like to do it.  In winter months, October-April (long winter right? Well, it is Michigan) my kilowatt charge during on-peak times (from 11:00 am – 7:00 pm Monday – Friday, excluding holidays) would be $0.095 per kwh, and in off peak hours 7 pm-11:00 am it would be $0.08.  Yeah, you read that right; only 1 ½  cent difference between on-peak and off-peak.  But get this- during summer months, on-peak times would be $0.12 and off-peak times $0.07 per kwh. A FIVE cent difference!

Here’s the catch.  I had to sign up for one year.  If I couldn’t convert most of my usage to the off-peak times, I could end up paying more for my electric bill.  I could lose money.  But if I didn’t try it I would never know.  I said “yes” for a year. 

The representative said they would be out to change the meter – because my old meter would not work.  Bonus!  I got to have a new meter!  I know this probably would not excite you like it did me.  But did you read my thoughts during last week's post on meters?  Boy, that old meter was hard to read (left to right, lowest number except between 9 and 0 ….) and I couldn’t even ask the kids to read it for me because they never got it right, and I would end up checking it myself. 

A new digital meter would be so, so……..fancy!  When it arrived with 0000 kwh, I was beside myself with awe. How much easier could this get?  The only hard part was when it started at 0000 kwh, and it was difficult to watch it go up because it will never be 0000 again. 

A Small Misunderstanding
Not all was smooth sailing. I did end up to calling the electric company to ask about the numbers the first time we read it.  One of the kids read 040916 one day, and then 041016 the next day.  What ?!?! 100 kwh in a day?!? What was going on? I called the company in distress.  Was my meter broken already?  It was also flashing different numbers after the first number.  She had to look it up.  Then she proceeded to tell me what each flash was and how there was a number corresponding to the number being read.  Oh, gee whiz! What a relief.  We had been reading the date, not our energy usage. 

On the bill below you’ll see energy with the amount of kilowatts used on “on peak” time and “off peak” time. 
Picture
Yeah!  86% of my energy usage is now happening in the off peak times!  I can’t wait to see next month’s bill.

*The two bills pictured are on two separate properties.  One unoccupied, thus the 2 kwh per day on the standard rate bill.

Stay tuned for Part 3!


*****

Note from Bethany: What I love about using off-peak hours for electricity is that it's not a sacrifice. Changing from standard rate to Time of Use does NOT require you to use less electricity. It only requires rearranging the schedule a bit.

Frugal Electric was able to save $5.37 during the month of June, by using electricity during off-peak hours. This is a savings that will keep going month after month, with no additional effort on her part. I call it "passive savings". She made a few phone calls, figured out a system for using electricity between 7:00 pm and 11:00 am, and now the $5.00/mo. savings will happen automatically.

Contrast this "passive savings" with line drying clothes. In order to save $5.37, you would have to hang out 11 loads of laundry per month. If it takes 15 minutes per load, that means you'll end up working an extra 2.75 hours every month to save the same $5.37. 
0 Comments

Saving on Electricity, Part 1

6/22/2016

1 Comment

 
Picture
From Bethany: One of my friends has offered to share in her area of frugal expertise: saving on electricity. There is huge potential to save in this area, so take notes! "Frugal Electric" is a mom, so those of you with children will appreciate her take on frugality. It is easy for a single person (or even a couple) to be frugal, but much harder for a large family. I'm hoping that she will share some of her "getting your family to cooperate" tips as we move forward with this series. :) 

How to Lower Your Electric Bill

Next to your grocery bill, I believe that lowering your electric bill is the one of the  biggest frugal hacks to take advantage of.  You can immediately see results and more monthly savings by paying attention and making changes on how you use electricity in your home. Today we will talk about meters and how to gauge how much electricity you are currently using, just with your meter alone. 

My Story

Have you ever noticed your electric meter?  I didn’t for the first 15 years of my married life.  I just paid the bill for the first 10 years, and then as part of my husband’s pay, his employer paid the bill for the last five years.  Cool perk, right?  (Now, I’m not sure.  As a landlord now, I don’t think I’ll ever pay my tenant’s electrical bill. It would be too hard of an expense to control when I’m not the one using it.  I mean, you can get attention by saying “utilities free”, but I’d rather give the renter $50.00 off the price of their rent per month). 
During this time we went from two children to five children. I remember one time hubby saying that the employer said the bill was over $400.00 one month.

Then we started a business at our home and hubby no longer worked for his employer.  This business required more electrical heating in the winter and more cooling equipment in the summer. We had multiple water heaters, refrigerators and freezers.  It was a dirty business – I mean you GOT dirty doing business, requiring several showers a day for several people in the family.  The washing machine was being used constantly.  A couple years or more and we were up to nine children; eight still at home and our electric bill was $1,200.00 A MONTH! I wasn’t sure if it was the lucrative business or our increasing family, but man that bill bothered me.
I called some experts out from the local university to do an energy audit.  What did they find?  Change a couple light bulbs and put a fan type heater above an outbuilding door to help keep heat in, and think about changing some motors out in some older equipment that sometimes ran.  Basically, the audit was not as helpful as I had hoped.  I just continued to pay the bill and tried not to think about it much.  If you’re in a business that requires lots of heating and cooling equipment than you might have to do the same, but the majority of us are not.
After 10 years in business we decided to take another path, sold the business and moved.  This is where we are at today.  The move was a good time for me to challenge myself to see how low I could get our electric bill.  Recording my daily or bi-daily usage was the first place to start.  Currently our electrical bill is only $75.00 a month for a family of nine.

It Starts With Reading the Meter

To track daily use of electricity (the first step to a lower electricity bill), it helps to be able to read your meter.  This costs nothing to do, but depending on your meter it may or may not be a learning process.  Your meter is located on the outside of your home where your electrical wires come in.  There are many types of meters, but they all measure your electricity.  In some areas there are smart meters that register daily and have online capability where you can check your usage online.  Ours does not.  A representative from our power company (who we call the “meter reader”) comes out and checks our meter each month and records the total usage. 
 
Digital Meter
Picture
How to read: Meter will blink with different numbers. 

Number 1: Date
Number 2: Time
Number 3: Total kilowatts (kwh)
Number 4: Peak time
Number 6 (there is no 5): Off-peak time


This is how my meter reads. Yours may be different.  Contact your power company to see what different numbers correspond to.  In the above example, the number 3 is showing a total kwh hours of 1205.  This is a relatively new meter. If you do not have on/off peak times your digital meter will simply read date, time and total kilowatts.

Older Style Meter 
Picture
How to read a non-digital meter:  

1. Read the dials from left to right. If the pointer is between the two numbers, always take the lower number.

2. If the pointer is directly over a number, write down that one. If the pointer falls between 9 and 0, write down "9" and reduce the reading you've already taken for the dial on it's left by one.  

A bit more complicated, but you can do it.  Before my meter was changed to digital one, I read an older style meter. Test yourself and see if you can read it*.

 
Recording Usage
​

Now that you know how to read your meter, record the number daily, even better twice a day.  I try to record mine at 11:00 am and 7:00 pm.  Not a fancy spreadsheet, app or program just a notebook that looks like this:

Date         Time       Total Kwh      On Peak       Off Peak
6/7           11:05 am      1128               158                 970
6/7             7:30 pm      1131                161                970
 
If I am not at home to do this, I just wait till the next time I can.  After you start keeping track, you will notice how your usage changes from day to day. You will start asking questions like, “Why was it so much more this morning than yesterday?” This is first step in getting your electrical bill under control. 

*Answer to older style meter: 60687

*********

From Bethany: Stay tuned next week for part two! In the mean time, start your own meter-reading chart.

1 Comment

ROI of Buying a Pressure Canner

5/27/2016

0 Comments

 
Picture
Just this week, we brought home a road-kill deer. Between the tenderloins and one ham, we were able to harvest 14 lbs. of meat. For free! Even with limited freezer space, I was still able to keep it. Thanks to... our handy-dandy pressure canner. :)

I LOVE LOVE LOVE the pressure canner. It allows me to make cheap bulk dried beans into ready-to-eat canned beans. It also allows us to keep far more meat in food storage than we would be able to, otherwise. I'm not a huge fan of pressure canning vegetables*, but that option is open as well.

Note: I didn't include the cost of canning jars, rings and lids in this analysis. I assume that if you're ready to attempt pressure canning, you've been water bath canning and already have a stockpile of jars/supplies.

Potential Savings:

Canned meat: The main cost savings with canned meat has to do with energy; you don't have to run a second freezer to store all of your stockpiled bargain/free meat. A vague (and probably too conservative) guess at energy costs for our old freezer is $6.00 per month.

Therefore, our yearly savings for canning meat = $72.00 per freezer of meat. 

A bonus of canning meat is that it comes out of the jar already cooked. This energy savings cancels out the energy cost of pressure canning.

Another bonus? If you pressure can bone-in meat (I use free chicken), your jar will have gelatin-rich broth in it, as well as the meat. This is perfect for making soup with. A lot of people mess around with either 1) making broth every week in a crockpot, or 2) making a ginormous pot once a month and freezing it in quart-size freezer bags. If you are one of these people, not only do you have a more crowded freezer, but you've also got to pay for all of those plastic bags and deal with any that bust open. If you freeze broth in glass jars, no doubt you've lost some due to breakage (caused by the expanding liquid). All this can be avoided if you making bone broth by pressure canning.

Canned beans: let's say an average can of navy beans costs $1.00 and holds two cups of cooked beans.

I buy my beans in bulk for $0.79/lb. One pound of dry beans= 2 1/3 cup. There is only 2/3 cup of dried beans in a can of store-bought beans, which means that my home-canned beans only cost about $0.23 per can. Add $0.05 per jar for a canning lid (I use mine at least twice before throwing them away), and the home canned beans cost $0.28 per can, for a cost savings of $0.72 per can.

If we used one pint jar ("can") of beans per week, the yearly savings for canned beans = $37.44. The more beans you eat, the more savings. But I'm just doing calculations for the two of us.

A beany bonus: some people cook a ton of beans in the crock pot, and then freeze them in plastic bags. In addition to using up freezer space and wasting plastic baggies, frozen beans have to be thawed before you can use them. Canned beans only have to be soaked and canned, and then they are ready to eat... forever. No freezer burn. No cooking, no freezing, no thawing, no re-washing plastic freezer bags.

Total yearly canned meat & beans savings: $109.44


Investing in a Pressure Canner & ROI
I bought our pressure canner from Walmart with some leftover wedding money. It is a Presto 16-quart aluminum pressure canner, and still costs only $69.97. As you can see, it will pay itself off in less than a year.

ROI after 1 year of use: $109.44 savings - $69.97 investment = $39.47 NET savings = 56% ROI
After 2 years: $148.91 net savings = 213% ROI
After 3 years: $258.35 = 369% ROI
After 4 years: $367.79 = 525% ROI
After 5 years: $477.23 = 682% ROI

It's hard to determine the exact ROI on this one, because it really depends how much and how long you use the pressure canner. A large family who cans for many years will save THOUSANDS of dollars by purchasing a pressure canner. But even a small family like ours will save enough in just one year to justify the cost. In my opinion, everyone should buy and learn how to use a pressure canner.

Last Words
What are you missing out on by not having or using a pressure canner? It may cause you to turn down fantastic deals because you don't have enough freezer space or can't eat a large amount of ___ before it goes bad. Pressure canning makes it possible to buy in bulk, even for a small family like ours. Instead of paying $2.00/lb. for chicken, I can pay $0.50/lb at Gordons. Health nuts can grow their own chickens. My point though, is that learning how to use a pressure canner will open up SO many more areas of saving. You will save more money on food by buying in bulk, you'll save $$ by not using disposable 2- or 3- use freezer bags, you'll save energy by not using the freezer, and you'll spend less time cooking and cleaning up after cooking. It's a win, win, win. 

We have one refrigerator/freezer combo, and one upright chest freezer to store all of the fruits & veggies that I grow, plus meats and farmers market ingredients. I use pressure canning as my "overflow" method for dealing with meats that don't fit in the freezer. Our freezer space is precious, and I really don't have the time or space to be freezing beans, broth, leftovers, crock-pot meals etc., so pressure canning is the perfect solution for those things. Unlike plastic baggies, canning jars are easy to wash and can be used for years- possibly a lifetime, if you're careful.

One of my goals in life is to save time, space, money and energy. Pressure canning does all of these things, and in some cases, produces a superior product to that which is frozen (tough meats come out of the jar tender, with no gristle). Sometimes I wonder if people would even bother freezing meat and beans if they knew how easy and cheap it was to can them.

-Bethany

*I'm not a fan of pressure canning veggies, because the high temperatures produced during pressure canning can destroy vitamins. Minerals, on the other hand, will stay intact regardless of heat (to the best of my knowledge). Therefore, I freeze any produce with high vitamin content, and can things like meat & beans. 
0 Comments

Frugal Accomplishments This Week

5/23/2016

0 Comments

 
Picture
I love a freshly mowed lawn!
1. Made $65.93 at the farmers market this weekend. I'm very happy with the way farmers market is turning out this year. I'm only selling three different baked goods every week, which take four or five hours to make (as opposed to ten last year). With the six hour market day (shortened one hour for the month of May!) and four hours of baking, I'm now making $5.00-$7.00/hr. doing the market as opposed to $1.00-$2.00. If you're interested in how I managed to do this, read my book, One Season of Farmers Market.

2. Helped Hubs make a book display stand for selling my books at the market, using free scrap lumber and an old used hinge. It works great! I put in another order of books today, as I've sold all but one of them. The net profit has almost surpassed that of Pizza Night, and I've only been selling it for a few weeks. Though it was more work to publish a physical book (as opposed to only an ebook), it was well worth it. Selling books is a passive form of income, which I love. I make the same profit selling one book as a bag of cookies, but the cookies have to be made again every week. A book only has to be made once.
Picture
Picture
Picture
3. Sold 9 dozen eggs.

4. Made cheese.

5. Made yogurt.
Picture
6. Made ice cream! One of my goals last week was to use up some extra milk before it soured, so on Saturday I decided to make some ice cream to go with rhubarb crisp I brought home from the market. I used the Cuisinart ice cream maker we received as a wedding gift (it's one with a freezable bowl). I've only used the appliance a couple of times, so it felt good to use it again. Instead of adding two cups of cream and one cup of milk, I just used three cups of goat milk. The ice cream turned out fine anyway! It was kind of "slushy" like any homemade ice cream, but after I put it in the freezer the texture was better. I figure that making the ice cream saved at least $3.00 as opposed to buying it. Plus I have better control over the ingredients that way. The only problem is that I keep putting it back in the fridge instead of the freezer. *facepalm*

7. Dried mints for tea & cilantro for seasoning.

8. Planted corn & flower seeds in the garden. As in the past, my pre-sprouted corn kernels started poking up from the ground a day or two after being planted. I can't say how much I love pre-sprouted sweet corn. I also collected more grass clipping mulch and did more mulching this week. 

9. Used a Ponderosa coupon (an email incentive) on our date night to get one of our buffet orders for free. This literally cut our bill in half! 
Picture
10. Made a Sugar Jar. We used the last of our salt last week, so I cut out the top of the container (with the metal pourer on top) and cut it down to the size of a small mouth canning jar lid. Then I used the new "lid" on a canning jar. I got this idea from the ever-popular Tightwad Gazette, given to me by a friend.

The Sugar Jar is my newest health & wellness project. Instead of eating NO sugar during the week and stuffing my face with it on the weekend (my previous plan), I put a whole week's worth of sugar in the sugar jar. Whenever I bake something with sugar, add sugar to tea, etc., it comes out of the sugar jar. And when the sugar is gone, it's gone. When Hubs ate half a box of Little Debbies, I took the sugar content of those snacks and poured it out of the jar. By the time he finished that and a can of pop, he had eaten half a cereal bowl full of sugar. Scary!!

To determine "a week's worth" of sugar, I used the amount rationed to British citizens in WWII. You know, for some historical flavor. You could also try amounts from different historical periods as well. Our sugar "ration" is a little over two cups per week (so, about one cup per person per week). I think the sugar jar is more effective psychologically for controlling sugar intake than total deprivation, but it also sheds some light on how much sugar is in prepared foods. "20 grams" is something that most of us have no concept of, but we can better picture the amounts in ounces or cups. Physically weighing out the sugar before you eat it is like paying for something in cash. It hurts more!
 
11. Used an Ibotta rebate paired with Manager's Special pricing to buy a loaf of bread for $0.25. In order to get the rebate, I had to peel off the sale sticker, which was hard to do without stretching the original barcode on the bread bag. But it was worth it. :)

12. Bought peanut butter on sale. We hardly ever eat peanut butter, but I do use it for farmers market baked goods. The cheapest we could find several weeks ago was a huge 4lb. jar for $1.58/lb. This week it was on sale for $1.00/lb., so I bought 12 lbs. This should be enough to last at least a year, even WITH baking for farmers market.

13. Earned $13.90 by returning aluminum cans and recyclable bottles. I also took a couple bike rides around the neighborhood and added cans to the stash before we returned them.

14. Got a Kroger "free" coupon. Every Friday, Kroger and its affiliates give out a coupon for one free designated item. This is only for those with an online account, which is easy to create. This week's freebie was a 2-liter of Kroger brand soda pop. The coupons last for two weeks.

15. Something I don't talk about often is eating out of the freezer and pantry. We do this every single week. During the springtime I work especially hard cleaning out the freezer to make way for more garden produce. This week we ate beef, lamb, green beans and sale-bought mozzarella cheese out of the freezer. Unlike cheddar and other pressed-curd cheeses, the mozzarella we froze actually sliced VERY well when thawed out. I still have some random vegetables (cauliflower, cucumbers, radishes, squash, pumpkin) as well as green beans and shelled peas to eat. I'm not sure what I'm going to do with the peas because they are kind of hard/overripe and I really hate eating peas. They might end up as chicken/goat food. :/ 
 
Goals for Next Week:
1. Move indoor plants outside.
2. Continue mulching garden.
3. Send in kids' registration paperwork.
4. Make more soaps.
5. Continue to clean and organize pantry/freezers.
0 Comments
<<Previous
Forward>>
    Picture

    Bethany

    Housewife, happy wife, and mama to one. :)

    Picture

    Picture
    The Housewife's Guide to Frugal Food
    How to Eat for $10.00
    ​per Week

    Picture
    The Housewife's Guide to Menu Planning
    A Weekly Menu to Save
    Time & Money
    Picture
    The Housewife's Guide to
    Frugal Fruits and Vegetables

    No Garden? No Problem!

    Watch Meals From the Bunker:

    Picture

    Check out my Youtube Channel!

    RSS Feed


    Picture
    Baby Girl's Birth Story
    Picture
    8 Cheap Ways to Eat Healthy
    Picture

    Categories

    All
    Animals
    Book Reviews
    Books
    Christmas
    Cleaning
    Clothing
    Cooking
    Couponing
    Education
    Ego
    Electricity
    Farmers Market
    Finance
    Foraging
    Frugal
    Frugal Accomplishments
    Frugality
    Garage Sales
    Gardening
    Gifts
    Grocery Budget
    Grocery Shopping
    Herbs
    History
    Hobby Farm
    Home Based Business
    Home-based Business
    Home Decorating
    Housekeeping
    Industry
    Languages
    Laundry
    Marriage
    Meal Planning
    Medicine
    Minimalist
    Network Marketing
    Organization
    Plants
    Product Reviews
    Quotes
    Recipes
    ROI
    Rv
    Sewing
    Simplicity
    Spanish
    Spending Report
    Travel

    Archives

    May 2021
    April 2021
    March 2021
    February 2021
    January 2021
    August 2020
    May 2020
    April 2020
    March 2020
    February 2020
    January 2020
    December 2019
    November 2019
    October 2019
    September 2019
    August 2019
    July 2019
    June 2019
    May 2019
    April 2019
    March 2019
    February 2019
    January 2019
    December 2018
    November 2018
    October 2018
    September 2018
    August 2018
    July 2018
    June 2018
    May 2018
    April 2018
    March 2018
    February 2018
    January 2018
    December 2017
    November 2017
    October 2017
    September 2017
    August 2017
    July 2017
    June 2017
    May 2017
    April 2017
    March 2017
    February 2017
    January 2017
    December 2016
    November 2016
    October 2016
    September 2016
    August 2016
    July 2016
    June 2016
    May 2016
    April 2016
    March 2016
    February 2016
    January 2016
    December 2015
    November 2015
    October 2015
    September 2015
    August 2015
    July 2015
    June 2015
    May 2015
    April 2015
    March 2015
    February 2015
    January 2015
    December 2014
    November 2014
    October 2014
    September 2014

    Full Disclosure & Disclaimer

    Picture
    Picture
    I get cash back for many online purchases including wedding gifts and Ebay stuff!

Powered by Create your own unique website with customizable templates.
Photos used under Creative Commons from dasWebweib, amanessinger, thewritingreader, diakosmein