the Renaissance Housewife
  • Home
  • Topics
    • Saving >
      • Kitchen >
        • Food >
          • Recipes
      • Bath & Laundry
      • Medicine Cabinet
      • Office
      • Electricity
      • Gardening
      • Foraging
      • Animals
      • Weekly F. A.'s
      • Printables & Downloads
    • Earning
    • Investing
  • Books
  • About
    • RH Recommends
    • Newsletter & Updates
    • Travel
    • Beta Readers
    • Legal Stuff

Saving on Electricity, Part 7: Extreme Cooling

8/4/2016

0 Comments

 
Extreme Cooling: Refrigeration 

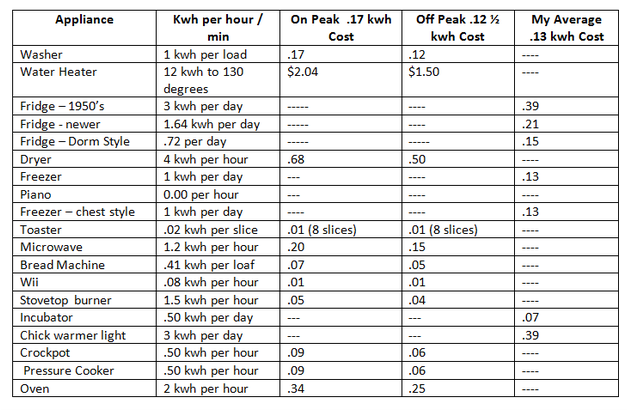
The refrigerator is one of the most energy-consuming appliances in the home because it runs day and night. Several months ago, I have stumbled upon an extreme way to save on electricity consumption from my refrigerator. 

One day, I thought the fridge was cycling more than normal. I hate to hear the fridge cycle; I envision money rolling away from me. I thought maybe the coils needed cleaning.  But the fridge is heavy and has pre-rollers on the bottom.  It would have to wait for my husband to get home.  It was early in the day, and it would be 8 hours before he got home and it Would. Not. Stop. Running.  I decided I would unplug it. There, it stopped.  Now what? I couldn’t just leave it unplugged.  There was food in there!

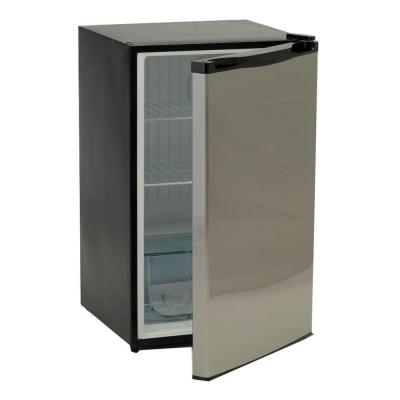
 I did have that little dorm-size fridge out in the garage I could temporarily use.
Picture
​ But how would it all fit?  I took everything out of the fridge and examined the contents on my counter.  Was there anything that did not have to be refrigerated?  How much could we eat and how quickly? I researched every item on my counter (aside from the obvious) to see if it needed to be refrigerated. Guess what?  There were many items on the list that we commonly refrigerate, but don’t have to!

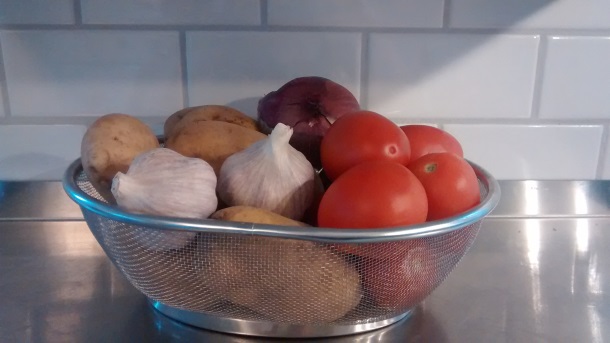
 I learned that onions, potatoes, garlic, vinegar and even soy sauce do not have to be refrigerated.  Maybe you knew this, but I didn’t.  Cabbage, if whole and wrapped does not have to be refrigerated.  I was buying cabbage at the store one day and I noticed that the store just had it shelved with other non- refrigerated vegetables.  Anything that the store is not refrigerating, you not have to refrigerate. Some things do need to be refrigerated after opening, but not all.  I tried not refrigerating carrots (the kind with the tops), but they became limp real fast. Then I remembered that they were stored in the refrigerated section of the store, so back into the fridge they went. 

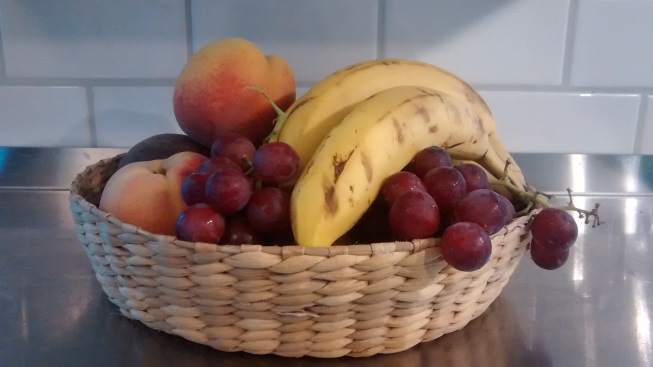
I got out some pretty baskets and put my non-refrigerated vegetables in them on the shelf. 
Picture
I prepared leftovers that day for lunch, and I planned a soup for supper.  I froze some leftovers* I knew would not fit and that we could not eat that day.  And finally, I got everything to fit in 4.5 cubic feet, down from my original 15 cubic feet.

Small Fridge vs. Large Fridge

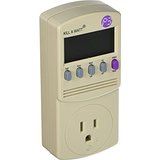
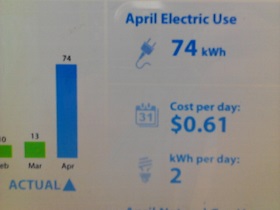
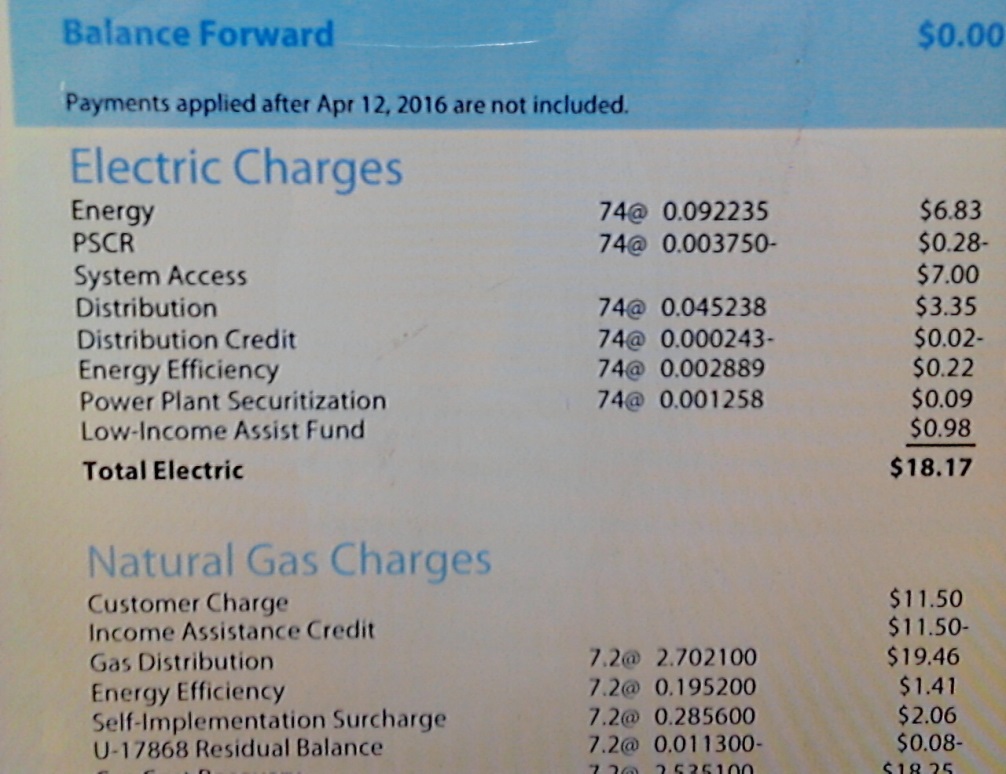
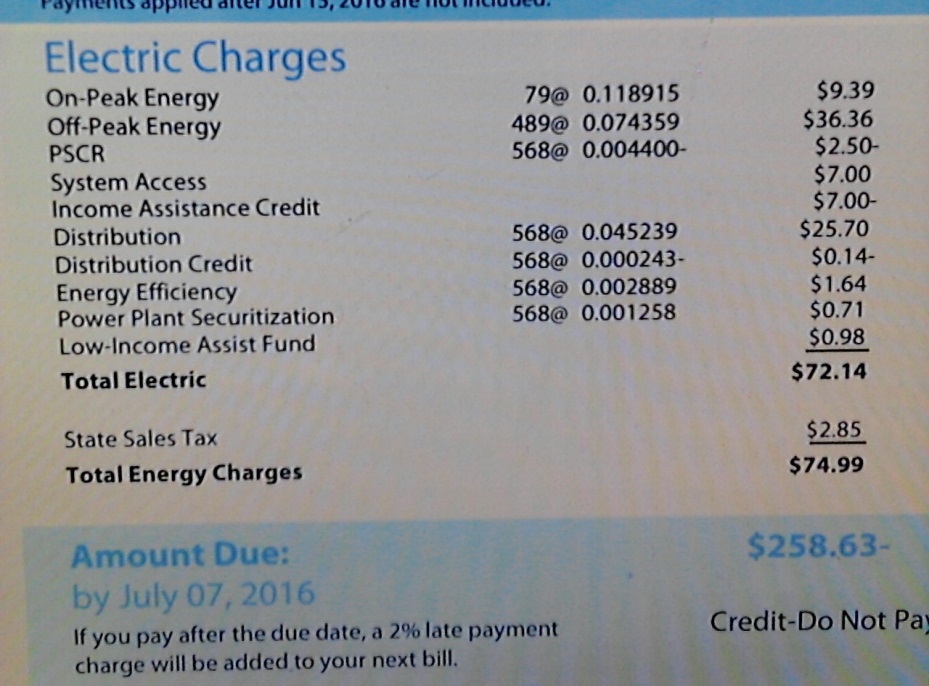
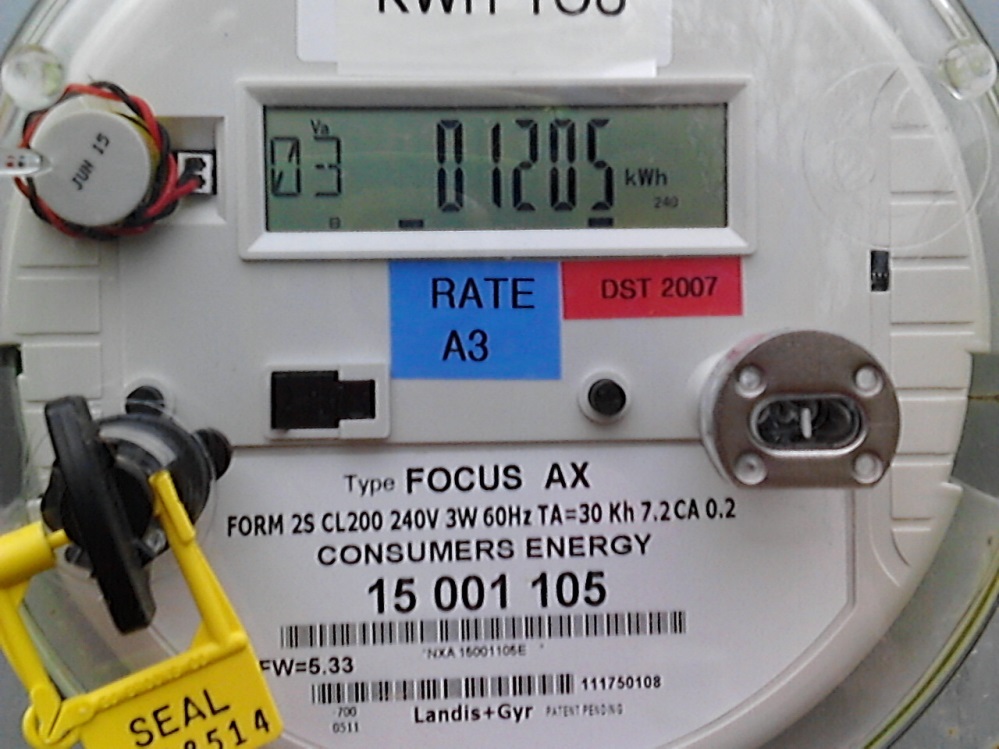
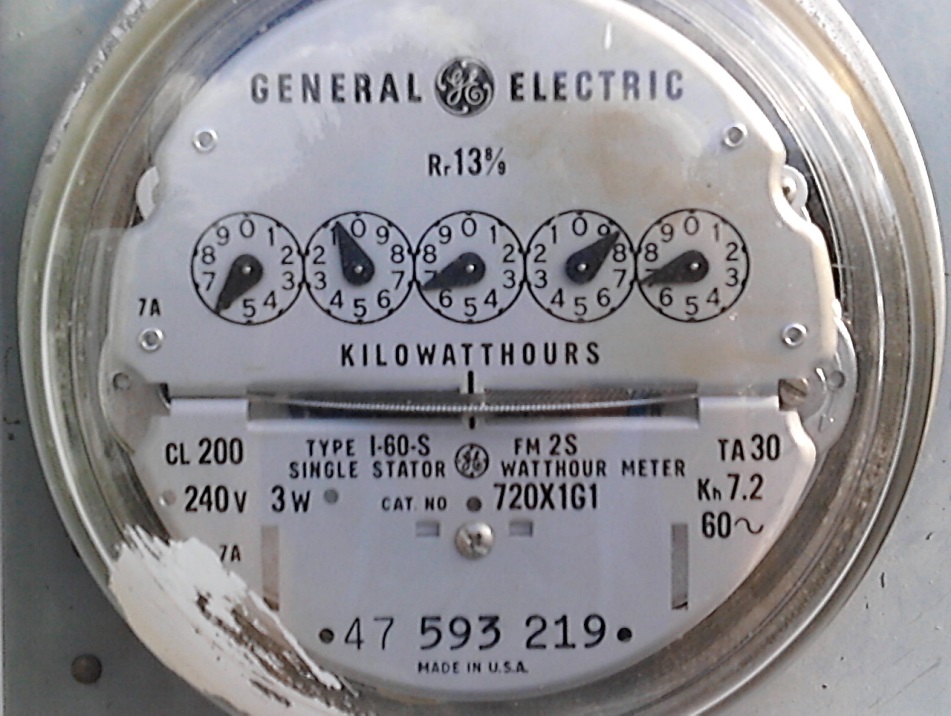
Then, I plugged in my kill-a-watt and waited 24 hours to read it. The results were good. This new fridge would only cost $3.00 per month to run, saving me $9.00 a month. How long could I make this last? I still hadn’t cleaned those coils in the big fridge.

Well it’s been a least three months and guess what?  I’m still operating out of the little fridge! I think there are several reasons it works for us.  For one, we rarely have leftovers.  If so, it’s usually only a serving or two. Also, we cook from scratch most of the time.  I’m using food from my pantry and freezer to prepare most of our meals.   

What I like the best about my small fridge is I know exactly…all the time…what is in my fridge.  No lost anything.  We have very little waste.  Also, space is so precious that I use it well.  This morning I needed to move more eggs into my little fridge but they wouldn’t fit.  I had un-thawed some peaches from the freezer and had some leftovers (surprise), jars of salsa, broth and spaghetti sauce that were taking up room.  I needed to use up some food to get my eggs to fit.

Boy #3 suggested and started working on peach pancakes for breakfast.  Then, I took the ½ jar of spaghetti sauce, 1 ½ of broth, ¼ jar of salsa and dumped them into my pressure cooker.  I added one can of corn, ½ onion and 6 potatoes and it was the best soup ever.  I used ¼ of the milk for pancakes, so I took out the gallon jug and put the milk in quart jars which fit better.  Viola! My eggs now fit.

I do make more trips to the store.  I actually like to go to the store and it is close to my home.  Going more often I find more marked down produce (even organic) and sales.  And if I have to use the produce right away its fine with me. I use it or preserve it (canning, dehydrating or freezing.)  I know most people spend more money when they go to the store more often, but not me.  I’ve tracked my expenses and the opposite is true.  Shopping only once or twice a month would cost us more.

I also keep a small cooler in the kitchen for extra items, should I have them.  One rubbermaid container of ice in my cooler will keep things cool until I use them or free up space in my little fridge. Using a cooler is like camping.  Except when we camp, we buy ice.  At home we make our own little ice packs and refreeze them, or we use items from the freezer that we need to unthaw anyway, like a chicken or a couple packages of ground beef.

​I love to see my fruit and vegetables in their baskets.  It reminds me to use them and brightens my kitchen in a minimalist way.
Picture
​In the future, I would love to try is turning a small chest freezer into a refrigerator.  Some bloggers claim that they consume only $6.00 per YEAR in electricity.  You can’t buy these (yet) but there are plans online that involve inserting a thermostat in the freezer to control the temperature and adding shelves to make the food more accessible. Here are some plans I’d like to try.    

When I was a kid, I had this great-aunt who always kept food on her screened back porch in the winter.  And honestly, I thought she was weird.  Now when I look back, I get it.  I get what she was doing.  She was either storing her leftovers out where they could cool prior to putting them in the fridge, or her fridge was full and this was her off grid leftover storage.  In Michigan we have a lot of free cooling we don’t use in the winter.
So, maybe, just maybe we don’t need as big as a fridge as we think we do.  Did you know that in Europe, the average size of a fridge is just 9.7 cubic feet?

Here is a good article on the history of the American fridge and how it got so big.

And another about how your American fridge is making you fat. This one is hilarious.

Could YOU downsize your fridge?  Or could you shut it off during a cold spell? At the very least, just think about emptying it when you leave to go on vacation.  It will save you some money and give you a chance to really see what’s in there.

*Note from Bethany: Freezing leftovers, in addition to freeing up fridge space, is smart because they will be fresher when you eat them. Some people separate leftovers before freezing (vegetables go in one freezer container, meat in another, etc.) and when the container is full, they make soup or casserole with it all. Bread ends can be frozen for bread crumbs; single grapes or other fruit ends can be frozen and used for smoothies.

*****
​
This is the last article in our Saving on Electricity series! I hope you have enjoyed it as much as I have over the last few months. -Bethany
0 Comments

Saving on Electricity, Part 6: Extreme Heating

7/28/2016

1 Comment

 
Picture
​Heating and cooling costs are a big part of your electricity bill.  Today we will look extreme ways to save on electrical heating costs.

Water Heater Hacks

When we moved into our present home, there was no working water heater.  We happened to still have a 80-gallon electric commercial water left from our last business. We like to use what we, have so we installed it.  I had already been looking for ways to save on our electric bill and I knew that this water heater, being so large, would cost more money to keep at a constant temperature.  So we did an experiment.

We turned it on until the temperature reached 140 degrees Fahrenheit out of the faucet.  Then we turned it off by turning off the breaker (much harder to do with a propane water heater; it may not be worth it because propane is more efficient, and it could be dangerous if you’re not familiar with lighting procedures and turning off the gas). After turning it off, we kept track of how long our hot water lasted.  Depending on the day and usage, we could get 2-3 days out of turning it on for three hours.  In three hours, the tank temperature reached 140 degrees. The water gradually cooled, but I didn’t need 140 degree water ALL THE TIME. This method still works well for us, and now we do it regularly. 

I thought turning our water heater on and off was quite extreme (like, none of my friends do this!) when the following happened...

A Light Bulb Moment


I was watering flowers in a near drought one day, when I had to wait for cold water because the water out of the hose was so stinking hot.  At the same time, I was waiting till off peak hours to turn the water heater on so I could do my dishes (didn’t quite get it done before 11:00 am).  And it hit me!  I could use this hot water to do my dishes…. this free hot water!  And by hot I mean HOT.  Getting out my thermometer I measure that water at 135 degrees F, hotter than most people set their water heaters at. What else could I use this water for?

Boy #3 was thinking the same thing a few hours later, because the next time I looked out the window I saw him with some shampoo and the hose over his head.  The problem was that the water was too hot, then instantly too cold.  Not to mention, holding the shampoo and the hose while trying to wash your hair was a bit hard.

Just for fun, we measured the temperature at different times of day, calculated how many gallons we got from 320 feet of hose.  In 3 - 4 hrs. (summer time) we can get at least 4 gallons of 140 degree water* to use for our shower.  We decided that if it was a hotter day, we could add some cold water to get the temperature we wanted. We thought up different ways we could make a shower, and then consulted Youtube searching for outdoor showers.  A couple of Youtube videos later, we had put together our own version using what we had around the house.

First, we found a clean five gallon bucket (this one might have held paint at one time).  We took a rope and attached it to the bucket handle.  Boy #3 added a clip to the end of the rope.  Ruining a few buckets by making too many holes, we finally drilled just 10 holes in the bottom of a bucket and found that each gallon gives us one minute of shower time.
Picture
​Oh, joy! Do you see the smile on his face?  This shower was  two minutes longer than the navy shower (get wet, turn water off, lather up, rinse off) that we had been experimenting with in the house. Extra time in the makeshift shower!

Are we going to do this all the time? No.  Will you see my family in a line outside on Sunday morning waiting their turn for a shower by the tree?  No.  Does it gives us more choices?  Yes, it does.  Have my children learned a new way of doing something?  Yes, they have!  And boy, was it fun working together on this project!

Other Heat-Saving Tips

Speaking of showers – a person can take a cold shower instead of a hot one.  I read about the health benefits of cold showers** in Tim Ferris’s book, The Four Hour Body.  I tried it….once.  I don’t know if I felt healthier, but I did feel more confident.  (Like, if I can do this, I can do anything).

Lastly, go south in the winter to a warmer climate.  Seriously, we’ve done this. Sometimes you can rent a home or condo (with utilities included) for less than the cost of utilities (fuel oil or propane and electricity) during the winter months in colder parts of the country.  As more jobs become location independent, this may work you. 

Next Steps

What is next for us? My husband has started to become interested in a solar hot water system and penciled out a plan to heat water using the sun, through a series of hoses connected to our hot water heater.  I’m very excited about this, as I’ve read that solar hot water systems cost around $5,000 and almost eliminate the need to pay for hot water.  I am interested to see how this works with our mid-west winters.

Next time we’ll talk about extreme cooling!

*A note of caution: Legionaries disease is a rare type of pneumonia that can infect immune suppressed people, and is often linked to water.  In my research, I’ve learned the bacteria Legionella is found in warm stagnant water (that is, water that has been sitting for days on end). The bacteria are dormant below 68 degrees and do not survive above 140°C.  I don’t worry about the legionella bacteria, as our water is being constantly moved.  We kill any bacteria by heating the hot water system to 140 degrees at least once a week and we are all pretty healthy. But as with everything you read, you should do your own research and decide what will work best for your family.

**Note from Bethany: I, too, have read and experienced the fact that hot water dries out your skin. In addition, it is recommend that curly- or wavy-haired people at least rinse (if not wash) their hair in cool water because it helps keep the curls tight and prevent them from getting frizzy.
1 Comment

Saving on Electricity, Part 5

7/22/2016

2 Comments

 
Picture
So far in this series, we’ve gone over:

1. How to Read your Electric Meter
2. Reading your Bill (How Much Your Kilowatts Cost You)
3. Measuring Electricity Inside the Home
4. Making Choices with What You Know (How Much Energy Does that Dryer Use)?

Now we’ll look at little tips that can save you BIG money.

1. Change your light bulbs to CFL or LEDs.
  This is an old tip and I’m hoping that you’ve already switched the light bulbs in your house. CFL are now relatively inexpensive as compared to when they first came out.  LED on the other hand can still be quite costly. I have a few LED and have bought them on sale.  Mostly we use CFL.  There is no reason to be using a 60 watt regular light bulb where a 13 Watt CFL will do.  At first I did not like the color of the light they put out.  But then I learned I had to look carefully at the label to see what I was buying.  I like a soft yellow light (not blue old style florescent light).  Some home improvement stores have displays that show the light the different color bulbs put out, which is helpful.  For cost comparison if I have 20 – 60 watt bulbs on 8 hours a day it will cost me approx.. $1.24.  By changing these to 20 – 13 watt bulbs I save .96 a day or $350.00 a year. 

​2. Sign up for Income or Elderly assistance if your electric company has it.  Most electric companies have programs that reduce the cost of your electric bill if you’re over 65 (sometimes 60), or if your annual household income is under a certain amount.  Whether or not you like these programs (since when is 60 old?), we all pay into these programs involuntarily.  Look at the bill below. You can see an item called Low Income Assist Fund that is added to the bill.  Each month we are contributing to the fund to support these programs. You will also see a $7.00 credit under income assistance. 
Picture
Yes, this year the company determined with the amount of people in our family and our annual income we should have a monthly credit.  I won’t argue with them.  $7.00 a month is $84.00 a year! For us, that is a free month of electricity.  And just for being a certain age you can have a credit of $3.50 a month, or $42.00 a year!  Can you do both?  Not with our company; it is one or the other.  Call your electric company or do a quick search on their website to see if there is a program that you qualify for.  

3.    Check your bill for mistakes.  Your electric company makes mistakes.  The first bill I received after changing my time of use rate they flipped the off and on peak numbers!  Yes, it showed 86% of my usage was during a peak time!  Check your bill and understand it so that if an error is made you can have it corrected.  Finding this error saved me $23.00 this year.

4.    Chest freezers are more efficient than upright freezers by almost 60 %.  My chest freezer would cost $2.34 more a month- $28.00 a year- if it were an upright.  Also, a chest freezer costs less money to buy.  In the long run you are saving money on energy AND the original purchase price.

5.    In cold weather, dress warmer; don’t turn the heat up. Add a sweater, socks and shoes. Add extra heat to a room, not the whole house. As an added bonus everyone will gather together to be in that room. Before bedtime, turn on an electric blanket for 30 minutes to warm your bed. Unplug it before you climb in. From there on out you will generate your own heat.  Don’t leave it plugged in all night! The difference for one bed for 30 min. instead of 8 hours is .20.  But for us, 6 electric blankets at 30 min. each will cost $.06 a day or $5.90 a year.  Saving us $113.40 a year (calculated at 90 days a year) by only having them on for 30 min. instead of 8 hours.

6.    In hot weather, do your best not to turn on the air conditioner. Home with the kids? Cool off in the afternoon in a pool, county or state park lake, city spray park, or your own sprinkler.  Go to the library in the afternoon or set up a cozy spot to read or play games in the basement (which is naturally cooler than above-ground levels of a house).  Keeping air conditioning off as compared to running it 3 hours a day for just 90 days out of the year saves us $122.85 per year. 

7.    Continue to educate yourself on electricity usage and your savings are infinite.   Here is one great site: www.michealbluejay.com. 

Next time we’ll talk about extreme ways (at least for we Americans) to save on heating and cooling.
2 Comments

Saving on Electricity, Part 4: The Great Reveal

7/15/2016

0 Comments

 
Picture
The Great Reveal….

Finding out how much energy each item in your house uses can be quite revealing.  When I can choose what time to run an item, I have reported on peak and off peak costs.  When the item is on constantly, I have averaged the price from my bill. Here are my results:
Picture
Notes on a few appliances:
Dryer – jeans still not dry after 1 hour on high. 
Water Heater – from completely cold (I shut it off, used the water up, and then turned it back on). 
Fridge – because of the cycling this is more accurate per day instead of hour.
Bread Machine – full cycle, one loaf of bread.
Piano – one hour read still 0.00

Making Things More Efficient

I can use the information above to make better choices about using electricity. We have time of use charges, therefore it is cheaper for me to run the highest consuming electrical items during the off peak electrical times.  I make sure any baking or wash is done prior to 11:00 am.  I will cook most of lunch prior to 11:00 am. We power wash vehicles on the weekend. We try to make supper after 7:00 pm, but this doesn’t always work.

Let’s say I want supper ready at 6:00 pm on Thursday because I’m having company (just because that is the only day that works for them... I would obviously have them over at an off-peak time! – HA HA) and I’ve chosen split pea soup with fresh bread.

Cooking the soup will cost:

Stovetop – 3 kwh - $0.51
Pressure Cooker - $0.13
Slow Cook 8 hours – $0.64

Baking the bread will cost:

Oven – $0.32
Bread Machine - $0.07

Knowing what I know now, I’ll be using the bread machine and cooking that soup in the electric pressure cooker. Simply changing the cooking method can save $0.75 without even trying. If bread and soup is a regular weekly meal, the payoff for making these simple changes in electricity usage is $39.00 per year. On ONE MEAL. 

Family Involvement & Learning Opportunities

When Boy #3 has a new business plan to hatching chicks in an incubator and sell them, I know just what his expense in electricity will be and he can add that cost to his business expense.

In our home we hang our clothes to dry. All of my children start doing their own laundry at age 8. They all earn money in one way or another, and if they choose to use the dryer it costs them $2.00.

They don’t all like to pay. Boy #2 went down to read the dryer usage (on the door) to figure out if he was being overcharged.  Most appliances have a sticker on the back, door, or somewhere that shows the estimated usage.

To figure out usage from the door sticker, he took number of volts (240) and multiply it by the number of amps (26) to get 8240 watts or 8.24 kwh per hour.  He took that 8.24 and multiplied it by our cost per kwh, $0.12.5 (off peak) to get $1.03.

Guess what? Smart Boy was being charged more than the actually usage!  It’s only $1.03, an overcharge of $.97! Am I lowering the price?  Ummm…..no.  We will call the remainder a convenience fee, but what great lessons he has learned!
  1. Always check your costs to make sure you are being charged correctly.
  2. Calculate the cost of usage when you are thinking about buying something by using the information on the appliance.
  3. I don’t need a dryer to have clean clothes.
  4. Convenience costs me money, better planning saves money.
  5. And a bit of math…..Volts * amps = watts.  To get a kwh you divide by 1000.
 
**When I tested the usage by shutting everything else down and recording the meter reading, I got 4 kwh per hour or $0.52 per hour, but an hour doesn’t always dry everything completely.  The information on the door does not match the actual usage in this case.

We need to look at everything in our homes that consume electricity- or better put, consumes our hard earned money. 

***When I took a step back and looked at my findings, I thought really, do pennies matter?  But beyond frugality, and my attempt to save my family money, there is more.  I don’t believe electricity will always be as reasonable as it is now.  Should it rise, or I move to another area (like Europe) my family is prepared and ready to consume as little as possible. There will be no learning curve for them.  From a green standpoint I also feel we are doing our part to conserve resources – even as a large family.

​Next time, we will look at little tips that can save you BIG money. 
0 Comments

Saving on Electricity, Part 3

7/6/2016

0 Comments

 
Picture
​Today we are going over different ways to measure your electricity inside the home.  Hopefully you know where your meter is and are tracking your daily or bi-daily usage.  You know how much each kilowatt is costing you and you’re considering time of use rates. 

What's Taking the Juice?

​You can find out what is using electricity in your home, item by item, in a couple different ways.  The first way is to simply unplug every in your home and then plug in one thing and a time and record it for an hour.  Some items are easy to unplug like the fridge and freezer (yes, these can be unplugged for a bit – just do not open them during the time they are unplugged and remember to plug them back in – set an alert on your phone).  Others, like the stove and water heater (if electric – do not turn off a gas water heaters or stoves – we are measuring electric usage) need to be shut off at the circuit panel. 

Your circuit panel looks like this:   
Picture
Box closed
Picture
Box opened
 It should be labeled so you can see which appliance is which.  Simply switch the stove and water heater to the off position (or opposite of what it currently is).  You will know if you forget to turn these back on, because after a while your water will be cold and the stove won’t work. 

Consider which appliance you will test first.  Maybe start with the stove.  I have unplugged everything but the stove and am now testing how many kilowatts the stove will use when I bake something.  I record the number that is showing on my meter.  Turn it on, let it run for an hour – bake something – you don’t want to waste this use of electricity!  Read your meter again.  The difference in the two numbers will tell you how much per hour the oven uses.  I can do this with the stove top burners as well.  When I tested my oven, it used 5 kwh per hour. 

I can do this with the dryer as well.  Before, my meter read 1297, and after it was 1301 (a difference of 4 kwh).  I had it running for an hour on high.
 
Option #2: Kill a Watt

The second way to measure is with an electric meter.  I got mine on Amazon years ago – when my electric bill was running in the $1000.00 month range.  This one is appropriately called the Kill A Watt.
Picture
P3 P4400 Kill A Watt Electricity Usage Monitor by P3 
 
I love this little device.  It has been worth my investment to have one.  When something new comes into the house, I can easily determine how it is going to increase my electrical bill. 

You don’t even have to unplug the rest of your home.  You just plug it in and then plug in your appliance into the device.  At any time you can just push a button to see how much it is using.  I like to leave mine on for 24 hours – especially the fridge, because it turns on and off so much.

For less than $20.00 this little device is handy.  I’ve also heard that some libraries carry them for checkout.  What a cool idea is that?!? When I’ve had friends who complain (err.. express concern) about their bill, I’ve lent it to them.  I’ve bought them for Christmas presents.  Can you tell I love these little devices?

Option #3: Wireless Home Electricity Monitor

​You can also invest hundreds of dollars into whole house electric use monitors that you can check online at home or anywhere.
Picture
Eyedro EHWEM1 Wireless Home Electricity Monitor, Wireless Internet Connection by Eyedro 
 
​These are really neat as they tell which rooms in the house are costing you the most in real time.  I drool over them but haven’t justified the cost yet and they do take somewhat of a professional to hook them into your circuit panel.  Some of them even have a reoccurring monthly charge.  When the price becomes less I may consider it.


Get a Kill a Watt – or borrow one, or unplug and record the meter while you test a specific item.  If you can’t do everything in the house, pick one or two things. Anything that heats or cools is a great place to start. Next week, I’ll go over what I discovered was using the most electricity in my house. And we'll discuss the choices you and I can make, with the information we have, to slash our electric bill. ​​
0 Comments

Saving on Electricity, Part 2

6/30/2016

0 Comments

 
Picture
This is a continuation of last week's guest post, Saving On Electricity, Part 1.

I hope that you know where your electrical meter is and are now recording daily or bi-daily readings.   Today we’ll look over an electric bill to see how much each kilowatt is costing you and establish your baseline usage.  We will also discuss different types of billing.

Cost Per Kilowatt Hour
If you have it, pull out your most recent electric bill.  If it is not available you may have to spend some time on the telephone or internet getting the information you need. 

Before doing the math, take a good look at your electric bill.  Our current energy supplier provides the following information for us on each bill.  Our last supplier did not, and we had to figure it out ourselves.  
Picture
Some electric companies will do all the work for you and supply this information right on the bill.
You’ll want to know:
1) How many kilowatts I used last month:  _________
2) How many days were in the billing period: ___________
3) Total cost of electric bill: __________

Take the number of total kilowatts (1) and divide it by the number of days in the billing period (2).  This is how many kilowatts you used each day last month.  Now take the total cost of the electric bill (3) and divide it by the total kilowatts you used last month.  This is your price per kilowatt.  To establish your price per day, take the total amount of the bill and divide it by the number of days in the billing period.

What is your price per kilowatt? _______
What is your price per day?________
How many kilowatts do you use a day?______
How many kilowatts do you use a month?______

Great job!  Establishing where you are at now will make it easier to see how much you’re saving each day!

"Standard Rate" Vs. "Time of Use" Bills
Now we are going to look at two different bills,   a Standard Rate bill and a Time of Use bill.

Standard Rate Bill
Picture
You’ll notice at the top of this bill under “energy” each kilowatt is actually costing .092235 (round to 9 cents).  The energy cost of .09 per kilowatt is the standard rate.  For the summer months of June – September, my rate increases if I go over 600 kilowatts per month.  So if I were on the standard rate system, my goal would be to stay under 600 kwh per month.  Your company may differ, but find out!

 Because there are so many cost factors added to your electrical bill each month (system access, distribution, power plant securitization, and more) I like to look at the total of the entire bill to figure cost of kilowatt.  By the time all the charges are added the kilowatt cost is .24 per kilowatt on this bill. 
 
Time Of Use Bill

In researching different ways I could lower my electric bill, I came across Time of Use rate.  I had always heard that doing your laundry or cooking in the off times would help lower the bill.  I never understood this, because my whole life we had always had standard rate.  There were no "on and off" times.  It was a mystery to me. Was the Time of Use rate even available for our family?

I googled my electric company name with the words “Time of Use”, and was directed to just a couple paragraphs that explained the differences in each rate; standard and time of use.  The website said, “You no longer have to qualify to use time of day rate. Anyone is eligible”. I’m guessing prior to this, one had to use a certain amount of energy to qualify.  I started getting excited.

I called the company.  I told them I’d like to try the Time of Use rate.  The representative told me, based on my current usage, that it would only save us $5.00 a month.  $5.00 a month is $5.00 a month.  I told her I’d like to do it.  In winter months, October-April (long winter right? Well, it is Michigan) my kilowatt charge during on-peak times (from 11:00 am – 7:00 pm Monday – Friday, excluding holidays) would be $0.095 per kwh, and in off peak hours 7 pm-11:00 am it would be $0.08.  Yeah, you read that right; only 1 ½  cent difference between on-peak and off-peak.  But get this- during summer months, on-peak times would be $0.12 and off-peak times $0.07 per kwh. A FIVE cent difference!

Here’s the catch.  I had to sign up for one year.  If I couldn’t convert most of my usage to the off-peak times, I could end up paying more for my electric bill.  I could lose money.  But if I didn’t try it I would never know.  I said “yes” for a year. 

The representative said they would be out to change the meter – because my old meter would not work.  Bonus!  I got to have a new meter!  I know this probably would not excite you like it did me.  But did you read my thoughts during last week's post on meters?  Boy, that old meter was hard to read (left to right, lowest number except between 9 and 0 ….) and I couldn’t even ask the kids to read it for me because they never got it right, and I would end up checking it myself. 

A new digital meter would be so, so……..fancy!  When it arrived with 0000 kwh, I was beside myself with awe. How much easier could this get?  The only hard part was when it started at 0000 kwh, and it was difficult to watch it go up because it will never be 0000 again. 

A Small Misunderstanding
Not all was smooth sailing. I did end up to calling the electric company to ask about the numbers the first time we read it.  One of the kids read 040916 one day, and then 041016 the next day.  What ?!?! 100 kwh in a day?!? What was going on? I called the company in distress.  Was my meter broken already?  It was also flashing different numbers after the first number.  She had to look it up.  Then she proceeded to tell me what each flash was and how there was a number corresponding to the number being read.  Oh, gee whiz! What a relief.  We had been reading the date, not our energy usage. 

On the bill below you’ll see energy with the amount of kilowatts used on “on peak” time and “off peak” time. 
Picture
Yeah!  86% of my energy usage is now happening in the off peak times!  I can’t wait to see next month’s bill.

*The two bills pictured are on two separate properties.  One unoccupied, thus the 2 kwh per day on the standard rate bill.

Stay tuned for Part 3!


*****

Note from Bethany: What I love about using off-peak hours for electricity is that it's not a sacrifice. Changing from standard rate to Time of Use does NOT require you to use less electricity. It only requires rearranging the schedule a bit.

Frugal Electric was able to save $5.37 during the month of June, by using electricity during off-peak hours. This is a savings that will keep going month after month, with no additional effort on her part. I call it "passive savings". She made a few phone calls, figured out a system for using electricity between 7:00 pm and 11:00 am, and now the $5.00/mo. savings will happen automatically.

Contrast this "passive savings" with line drying clothes. In order to save $5.37, you would have to hang out 11 loads of laundry per month. If it takes 15 minutes per load, that means you'll end up working an extra 2.75 hours every month to save the same $5.37. 
0 Comments

Saving on Electricity, Part 1

6/22/2016

1 Comment

 
Picture
From Bethany: One of my friends has offered to share in her area of frugal expertise: saving on electricity. There is huge potential to save in this area, so take notes! "Frugal Electric" is a mom, so those of you with children will appreciate her take on frugality. It is easy for a single person (or even a couple) to be frugal, but much harder for a large family. I'm hoping that she will share some of her "getting your family to cooperate" tips as we move forward with this series. :) 

How to Lower Your Electric Bill

Next to your grocery bill, I believe that lowering your electric bill is the one of the  biggest frugal hacks to take advantage of.  You can immediately see results and more monthly savings by paying attention and making changes on how you use electricity in your home. Today we will talk about meters and how to gauge how much electricity you are currently using, just with your meter alone. 

My Story

Have you ever noticed your electric meter?  I didn’t for the first 15 years of my married life.  I just paid the bill for the first 10 years, and then as part of my husband’s pay, his employer paid the bill for the last five years.  Cool perk, right?  (Now, I’m not sure.  As a landlord now, I don’t think I’ll ever pay my tenant’s electrical bill. It would be too hard of an expense to control when I’m not the one using it.  I mean, you can get attention by saying “utilities free”, but I’d rather give the renter $50.00 off the price of their rent per month). 
During this time we went from two children to five children. I remember one time hubby saying that the employer said the bill was over $400.00 one month.

Then we started a business at our home and hubby no longer worked for his employer.  This business required more electrical heating in the winter and more cooling equipment in the summer. We had multiple water heaters, refrigerators and freezers.  It was a dirty business – I mean you GOT dirty doing business, requiring several showers a day for several people in the family.  The washing machine was being used constantly.  A couple years or more and we were up to nine children; eight still at home and our electric bill was $1,200.00 A MONTH! I wasn’t sure if it was the lucrative business or our increasing family, but man that bill bothered me.
I called some experts out from the local university to do an energy audit.  What did they find?  Change a couple light bulbs and put a fan type heater above an outbuilding door to help keep heat in, and think about changing some motors out in some older equipment that sometimes ran.  Basically, the audit was not as helpful as I had hoped.  I just continued to pay the bill and tried not to think about it much.  If you’re in a business that requires lots of heating and cooling equipment than you might have to do the same, but the majority of us are not.
After 10 years in business we decided to take another path, sold the business and moved.  This is where we are at today.  The move was a good time for me to challenge myself to see how low I could get our electric bill.  Recording my daily or bi-daily usage was the first place to start.  Currently our electrical bill is only $75.00 a month for a family of nine.

It Starts With Reading the Meter

To track daily use of electricity (the first step to a lower electricity bill), it helps to be able to read your meter.  This costs nothing to do, but depending on your meter it may or may not be a learning process.  Your meter is located on the outside of your home where your electrical wires come in.  There are many types of meters, but they all measure your electricity.  In some areas there are smart meters that register daily and have online capability where you can check your usage online.  Ours does not.  A representative from our power company (who we call the “meter reader”) comes out and checks our meter each month and records the total usage. 
 
Digital Meter
Picture
How to read: Meter will blink with different numbers. 

Number 1: Date
Number 2: Time
Number 3: Total kilowatts (kwh)
Number 4: Peak time
Number 6 (there is no 5): Off-peak time


This is how my meter reads. Yours may be different.  Contact your power company to see what different numbers correspond to.  In the above example, the number 3 is showing a total kwh hours of 1205.  This is a relatively new meter. If you do not have on/off peak times your digital meter will simply read date, time and total kilowatts.

Older Style Meter 
Picture
How to read a non-digital meter:  

1. Read the dials from left to right. If the pointer is between the two numbers, always take the lower number.

2. If the pointer is directly over a number, write down that one. If the pointer falls between 9 and 0, write down "9" and reduce the reading you've already taken for the dial on it's left by one.  

A bit more complicated, but you can do it.  Before my meter was changed to digital one, I read an older style meter. Test yourself and see if you can read it*.

 
Recording Usage
​

Now that you know how to read your meter, record the number daily, even better twice a day.  I try to record mine at 11:00 am and 7:00 pm.  Not a fancy spreadsheet, app or program just a notebook that looks like this:

Date         Time       Total Kwh      On Peak       Off Peak
6/7           11:05 am      1128               158                 970
6/7             7:30 pm      1131                161                970
 
If I am not at home to do this, I just wait till the next time I can.  After you start keeping track, you will notice how your usage changes from day to day. You will start asking questions like, “Why was it so much more this morning than yesterday?” This is first step in getting your electrical bill under control. 

*Answer to older style meter: 60687

*********

From Bethany: Stay tuned next week for part two! In the mean time, start your own meter-reading chart.

1 Comment
    Picture

    Bethany

    Housewife, happy wife, and mama to one. :)

    Picture

    Picture
    The Housewife's Guide to Frugal Food
    How to Eat for $10.00
    ​per Week

    Picture
    The Housewife's Guide to Menu Planning
    A Weekly Menu to Save
    Time & Money
    Picture
    The Housewife's Guide to
    Frugal Fruits and Vegetables

    No Garden? No Problem!

    Watch Meals From the Bunker:

    Picture

    Check out my Youtube Channel!

    RSS Feed


    Picture
    Baby Girl's Birth Story
    Picture
    8 Cheap Ways to Eat Healthy
    Picture

    Categories

    All
    Animals
    Book Reviews
    Books
    Christmas
    Cleaning
    Clothing
    Cooking
    Couponing
    Education
    Ego
    Electricity
    Farmers Market
    Finance
    Foraging
    Frugal
    Frugal Accomplishments
    Frugality
    Garage Sales
    Gardening
    Gifts
    Grocery Budget
    Grocery Shopping
    Herbs
    History
    Hobby Farm
    Home Based Business
    Home-based Business
    Home Decorating
    Housekeeping
    Industry
    Languages
    Laundry
    Marriage
    Meal Planning
    Medicine
    Minimalist
    Network Marketing
    Organization
    Plants
    Product Reviews
    Quotes
    Recipes
    ROI
    Rv
    Sewing
    Simplicity
    Spanish
    Spending Report
    Travel

    Archives

    May 2021
    April 2021
    March 2021
    February 2021
    January 2021
    August 2020
    May 2020
    April 2020
    March 2020
    February 2020
    January 2020
    December 2019
    November 2019
    October 2019
    September 2019
    August 2019
    July 2019
    June 2019
    May 2019
    April 2019
    March 2019
    February 2019
    January 2019
    December 2018
    November 2018
    October 2018
    September 2018
    August 2018
    July 2018
    June 2018
    May 2018
    April 2018
    March 2018
    February 2018
    January 2018
    December 2017
    November 2017
    October 2017
    September 2017
    August 2017
    July 2017
    June 2017
    May 2017
    April 2017
    March 2017
    February 2017
    January 2017
    December 2016
    November 2016
    October 2016
    September 2016
    August 2016
    July 2016
    June 2016
    May 2016
    April 2016
    March 2016
    February 2016
    January 2016
    December 2015
    November 2015
    October 2015
    September 2015
    August 2015
    July 2015
    June 2015
    May 2015
    April 2015
    March 2015
    February 2015
    January 2015
    December 2014
    November 2014
    October 2014
    September 2014

    Full Disclosure & Disclaimer

    Picture
    Picture
    I get cash back for many online purchases including wedding gifts and Ebay stuff!

Powered by Create your own unique website with customizable templates.
Photos used under Creative Commons from dasWebweib, amanessinger, thewritingreader, diakosmein