the Renaissance Housewife
  • Home
  • Topics
    • Saving >
      • Kitchen >
        • Food >
          • Recipes
      • Bath & Laundry
      • Medicine Cabinet
      • Office
      • Electricity
      • Gardening
      • Foraging
      • Animals
      • Weekly F. A.'s
      • Printables & Downloads
    • Earning
    • Investing
  • Books
  • About
    • RH Recommends
    • Newsletter & Updates
    • Travel
    • Beta Readers
    • Legal Stuff

Corn Meal Mush / Polenta

3/3/2016

1 Comment

 
Picture
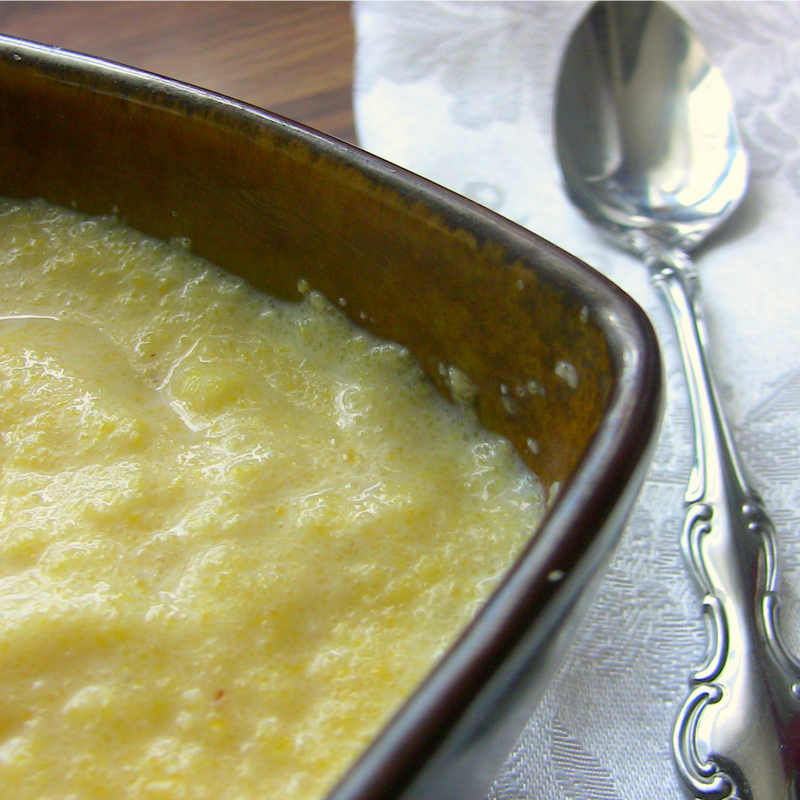
Corn meal mush is exactly like cream of wheat, except it's corn instead of wheat. Which is great for all of you gluten-free people! I make this as a hot cereal because it is so much cheaper ($0.15 for a bowl). The recipe below makes two 1-cup servings.

Corn Meal Mush

Ingredients:
1 cup corn meal
1 cup water
1/4 tsp. salt
Milk
Honey, maple syrup or sugar to taste

Instructions:
Put all ingredients in a small sauce pan and stir, bringing to a boil. After the cereal cooks for 30 seconds to a minute, it will be done. When it is hard to stir and there are blobs of cereal flying up in your face, it is probably done. Serve with a little milk and sweetener of your choice.

Sometimes corn meal mush is also called "polenta".

You can also let the corn meal mush solidify in the refrigerator, slice it up, and fry it in bacon grease or other animal fat to be used as a side dish.
1 Comment

Split Pea Soup

3/3/2016

0 Comments

 
Picture
Split pea soup is one of my go-to meals. It barely slides into my "under $1" list; the split peas alone cost $0.44, the onion $0.33. If spices cost $0.03, you have $0.20 left to spend on cheese ($0.04/tsp.), crackers ($0.01 each) and meat. You can read my note about meat below. Hardcore frugalistas can grow their own onions ($0.03 each) or use 1 TB onion powder*** (about the same price), which would easily bring the meal to under $1.00. 

Split Pea Soup

Ingredients:
1 small onion, diced
6 c. broth or water*
1 1/2 cups dried peas
1 c. cooked ham or bacon**
3 bay leaves
1 1/2 tsp. salt
1 tsp. italian seasoning
1/4 tsp. pepper

Instructions:
Put onions, water, dried peas and bay leaves in the pot to boil together until the peas are done; about 30-45 minutes. Make sure you use a big enough pot and/or keep the lid off; otherwise it will boil over. Turn down the heat when the peas are soft and add spices and meat. Serve with cheese and saltine crackers.

*I wouldn't recommend cooking the peas in broth unless you are doing it purely for flavor, because boiling breaks down the gelatin. However, sometimes I will cook the peas in 4-5 cups of water and add additional broth when they are almost done cooking.

**You can omit or reduce the meat if you don't have it on hand. Often times I only put a handful of bacon bits or ham shreds in, not the full amount. The peas have lots of protein, so meat is mostly for flavor. When I don't have any meat, I try to add a spoonful of bacon grease for flavor.

***Using onion powder lessens the nutritional value of the meal (essentially no veggies...). But I've done it in a pinch. If you are like me and haven't reached the point of growing your own onions yet, you can always use onion powder and then serve free garden veggies that you DO grow as a side dish.
0 Comments

Chili Recipe: Under $1

3/3/2016

0 Comments

 
Picture
Chili is another meal that is extremely cheap to make if you have a garden and can find free or inexpensive meat. For this recipe I use home canned dry beans ($0.15 per pint), venison chunk meat ($0.00-$0.30/half pound), homemade taco seasoning ($0.10?), home canned tomato juice and/or hominy or sweet corn from the garden. The green onions are grown on my windowsill, or I use dried chives from the garden. Store bought crackers, sour cream and cheese for garnish are the majority cost for this meal.

Chili

Ingredients:
1 pint canned chunk meat (10 cents)
1 pint home-canned dry beans (10 cents)
2-3 TB homemade taco seasoning
Handful of chopped green onions or chives (use 1-2 TB if dried)
Salt to taste
1-2 cups hominy or frozen sweet corn
1 quart tomato juice
Saltines, sour cream and cheese for garnish

Instructions:
Dump meat into cooking pot. Use a fork to pull apart any large chunks or pieces that are sticking together. Add canned beans and corn/hominy. Add tomato juice and turn heat to High. Lastly, add taco seasoning, green onions and salt to taste. Cook until everything is hot. Serve with saltines, sour cream and shredded cheese.

0 Comments

How to Make Taco Seasoning

3/3/2016

0 Comments

 
Picture
Every couple months I mix up a big batch of this stuff. I use it in most of my Mexican dishes.

Taco Seasoning

Ingredients:
2 TB cornstarch
2 TB onion powder
2 TB garlic powder
4 TB chili powder
2 tsp. red cayenne pepper
2 TB cumin
1 TB oregano
2 TB salt
2 TB paprika 

Instructions: Mix everything together in a bowl, and store in an airtight container.
0 Comments

Fermentation Friday: Yogurt

12/12/2014

0 Comments

 
Picture
You remember Fermentation Friday? That thing I started before we left for Guatemala? Well, it's time to start again. The fact that it's winter only increases the need for extra nutrients that fermentation supplies.

Today we're going to do something pretty easy. Yogurt can be 'fermented' in one night. It's packed with probiotics- good for your gut! And last but not least, DIY yogurt is only $1 per quart to make. A great way to start saving money and eating healthier. All you need to start is a small container of yogurt that contains live active cultures (it will say this on the container), one half or one whole gallon of milk, and a candy thermometer.

Instructions:

1. Heat milk to 180 degrees F. Just FYI: I have forgotten to check the milk and accidentally let it boil. If this happens, not all is lost. Just turn off the heat and move on to the next step.
2. Let cool to 105-116 degrees F. For a half-gallon of milk, this usually takes a half hour.
3. Add yogurt starter. Use a wire whisk (or fork, or whatever) to mix in your container of live active culture yogurt.
4. Incubate. This can be done several ways. 
A) Since our family is just Hubs and I, I use a half-gallon Yogourmet yogurt maker to incubate. This works very well for us, especially if I let it incubate 18-24 hours. The extra incubation time makes it extra thick and creamy. 
B) When I lived with my parents (and lots of siblings), I used mason jars in a cooler of hot tap water, with boiling water to top it off with. I let this sit overnight, with varying results. 
C) Recently my mom started using a gas stove, and she said it works well to simply set the jars in the oven and let the pilot light incubate the yogurt overnight. This is very economical since the pilot light would be on anyway. 
D) A fourth way to incubate would be with a crock pot. Personally I have not seen great success with a crock pot.

Troubleshooting: If your yogurt comes out watery or "chunky", never fear. Use a cheesecloth to strain out the whey and make "yogurt cheese". When it has all drained, whip a little bit of the whey back into the yogurt cheese, with some jelly or honey if desired. This makes an excellent texture and taste.

The type of milk, amount of starter, and length of incubation time might have an effect on the success of the yogurt. When I first started making yogurt, I used raw, non-homogenized milk. I was stingy with the starter, using only a few tablespoons for a whole gallon. This produced watery, often runny yogurt, but I figured that was just how homemade yogurt was.

After we got married I started using pasteurized, homogenized milk from the store. I only need to make two quarts of yogurt per week, and use a whole single-serving container of starter instead of a few tablespoons. Now oftentimes I make yogurt in the morning so it has a day and a half to incubate, whereas at my parents' house I would make the yogurt late at night, so it would get maybe 8 hours of incubation time. Using my new methods, I haven't had a failed or runny batch of yogurt in months.

Happy yogurt-making!

-Bethany 
0 Comments

Venison Bone Broth

10/27/2014

0 Comments

 
Picture
As promised, today I'm bringing you my 'new' discovery, made possible by my brother-in-law, the Mighty Hunter. I had made chicken broth and beef broth before, but had never considered bone broth from deer. If you butcher an animal yourself, you get extra perks like carcasses full of bones. Yay!

Back in the day, people didn’t have capsules and powders to keep them healthy. Everything came from plants and animals. Each part was up for grabs; leaves, fruits, seeds, nuts, bark and roots… skins, hoofs, brains, and eyeballs. These “weird” items contributed macro and micro nutrients- everything we needed for good health.

Instead of discarding our deer carcass, I saved the bones and made a nice gelatin-rich broth. Bone broth is super-super healthy for you and easy to make. It’s great for your bones and teeth, skin, hair and nails. This is how I made mine:

1.      Put bones in a big stock pot (I used my aluminum pressure canner… probably not the best but better than nothing!).

2.      Cover with water.

3.      Add some apple cider vinegar (1/4-1/2 cup). This draws out the gelatin.

4.      Also add seasonings if desired; onions, carrots, celery, red pepper flakes, ginger, garlic, salt, pepper, etc.

5.      Bring to a boil; turn heat down to simmer and let it cook for at least 10 hours- longer is better.

That’s it! When it’s done, you’ll have a pot of ugly-looking but very healthy broth, bones, and seasoning veggies. You can get three things out of this pot:

1. Broth: You can strain the liquid into a jar; that takes too long for me, so I just ladle the broth into the jars, trying to keep the bits and pieces out. When you refrigerate it, the broth will gel up and the fat will separate to the top. 

2. Fat: I skim off the fat to render and use for other purposes. Would you believe that butter costs over $1 per stick here? I think I’ll use free fat to butter my egg pan in the morning.

3. Bone meat: Meat picked off the bones will have a distinctive taste, unlike chicken or beef broth. I don't really like the taste, so I use the meat in heavily-seasoned soups and sauces.

Happy Monday!

Do you make bone broth? Have you ever eaten weird animal parts like hooves or eyes?


0 Comments

How To Make Granola

9/26/2014

0 Comments

 
This recipe is included in my book (on Amazon October 1st!), Pizza Night; A Simple Meal Plan. It is one of my favorites. :)

I am a big eggs-for-breakfast fan, but Hubs is all about his granola. I make this for him to have on the days that 1) he doesn't feel like eggs, or 2) I don't feel like cooking (early mornings, anyone?). I prefer this over hot or cold cereal because it only takes one bowl to fill you up. I normally use nuts OR coconut, but not both. This recipe makes about an oatmeal container full- 7-9 cups.
Picture
Cost per recipe: varies with ingredients- $3.32  without *optional ingredients.

Ingredients:
7 cups oats (either kind)
*2 cups unsweetened coconut 
*1 1/2 cup nuts

1 cup melted butter
1/3 cup milk
1 1/2 cups sugar, *honey, *maple syrup, or other sweetener
1/2 tsp salt

Instructions:
1. Mix top three ingredients and any other additional dry ingredients (wheat germ, flax seed, chia seed, etc.) in a large mixing bowl.

2. Melt together butter, milk, sweetener and salt in a small saucepan to get a syrupy mixture.

3. Pour syrup over dry ingredients and mix until everything is coated.

4. Bake 25 minutes at 325 degrees F. Stir.

5. Bake another 15 minutes at 225 degrees F. Stir.

6. Bake yet another 10 minutes.

7. Turn off the oven and let bake for another hour.

After the granola is all baked, add optional fruit if desired. Adding the fruit afterward prevents it from getting hard in the oven.

Hubs likes a chunky, less-stirred granola. I prefer a finer, more-stirred granola. I didn't know this until I made a 'bad' batch with big, hard parts and Hubs told me he really liked it. What the heck!? Different strokes for different folks.

What is your go-to breakfast?
0 Comments
    Picture

    Bethany

    Housewife, happy wife, and mama to one. :)

    Picture

    Picture
    The Housewife's Guide to Frugal Food
    How to Eat for $10.00
    ​per Week

    Picture
    The Housewife's Guide to Menu Planning
    A Weekly Menu to Save
    Time & Money
    Picture
    The Housewife's Guide to
    Frugal Fruits and Vegetables

    No Garden? No Problem!

    Watch Meals From the Bunker:

    Picture

    Check out my Youtube Channel!

    RSS Feed


    Picture
    Baby Girl's Birth Story
    Picture
    8 Cheap Ways to Eat Healthy
    Picture

    Categories

    All
    Animals
    Book Reviews
    Books
    Christmas
    Cleaning
    Clothing
    Cooking
    Couponing
    Education
    Ego
    Electricity
    Farmers Market
    Finance
    Foraging
    Frugal
    Frugal Accomplishments
    Frugality
    Garage Sales
    Gardening
    Gifts
    Grocery Budget
    Grocery Shopping
    Herbs
    History
    Hobby Farm
    Home Based Business
    Home-based Business
    Home Decorating
    Housekeeping
    Industry
    Languages
    Laundry
    Marriage
    Meal Planning
    Medicine
    Minimalist
    Network Marketing
    Organization
    Plants
    Product Reviews
    Quotes
    Recipes
    ROI
    Rv
    Sewing
    Simplicity
    Spanish
    Spending Report
    Travel

    Archives

    May 2021
    April 2021
    March 2021
    February 2021
    January 2021
    August 2020
    May 2020
    April 2020
    March 2020
    February 2020
    January 2020
    December 2019
    November 2019
    October 2019
    September 2019
    August 2019
    July 2019
    June 2019
    May 2019
    April 2019
    March 2019
    February 2019
    January 2019
    December 2018
    November 2018
    October 2018
    September 2018
    August 2018
    July 2018
    June 2018
    May 2018
    April 2018
    March 2018
    February 2018
    January 2018
    December 2017
    November 2017
    October 2017
    September 2017
    August 2017
    July 2017
    June 2017
    May 2017
    April 2017
    March 2017
    February 2017
    January 2017
    December 2016
    November 2016
    October 2016
    September 2016
    August 2016
    July 2016
    June 2016
    May 2016
    April 2016
    March 2016
    February 2016
    January 2016
    December 2015
    November 2015
    October 2015
    September 2015
    August 2015
    July 2015
    June 2015
    May 2015
    April 2015
    March 2015
    February 2015
    January 2015
    December 2014
    November 2014
    October 2014
    September 2014

    Full Disclosure & Disclaimer

    Picture
    Picture
    I get cash back for many online purchases including wedding gifts and Ebay stuff!

Powered by Create your own unique website with customizable templates.
Photos used under Creative Commons from dasWebweib, amanessinger, thewritingreader, diakosmein