the Renaissance Housewife
  • Home
  • Topics
    • Saving >
      • Kitchen >
        • Food >
          • Recipes
      • Bath & Laundry
      • Medicine Cabinet
      • Office
      • Electricity
      • Gardening
      • Foraging
      • Animals
      • Weekly F. A.'s
      • Printables & Downloads
    • Earning
    • Investing
  • Books
  • About
    • RH Recommends
    • Newsletter & Updates
    • Travel
    • Beta Readers
    • Legal Stuff

Chicken Feet Stock

1/30/2015

2 Comments

 
Picture
Hey everyone! Maybe Guatemala has rubbed off on me, but today I'm going to talk about something really cool that I've discovered.

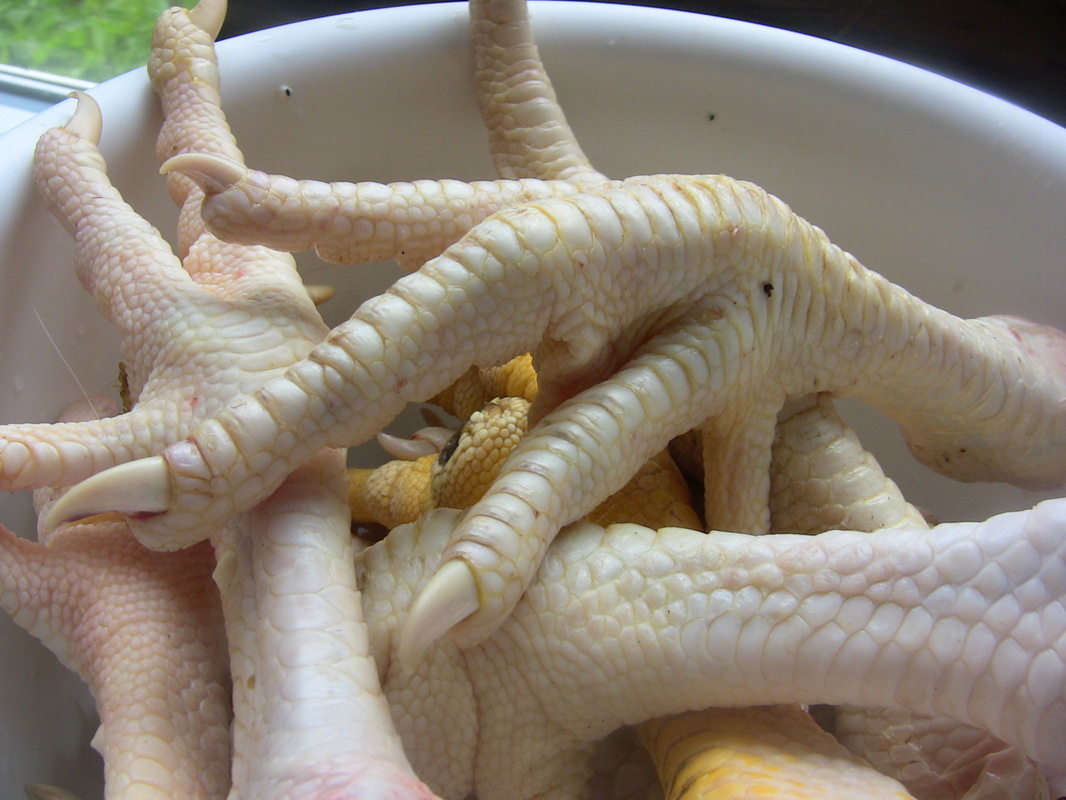
Some of us have at our disposal chicken wings, necks, and yes- feet. These less-meaty parts are absolutely wonderful for making gelatinous bone broth with. What I love about chicken feet is that everyone thinks they are gross and nobody wants them. That translates into more available chicken feet for opportunists like me. 

The feet are an AMAZING source of gelatin, so please don't throw them out when you butcher! With some cleaning and preparation, these worthless appendages can be turned into nutritional gold.

1. Wash the feet. During the butchering process, my chicken feet got pretty clean, plus they were pastured chickens and pretty clean to start with. But if your chicken feet have clumps of poop on them, PLEASE... by all means wash it off.

2. Dip the feet in boiling water for 10-20 seconds, then plunge into ice water. Basically like blanching green beans.

3. Peel the top layer of scales off. In addition to sterilizing the feet, you've now peeled off the top layer and greatly reduced the "gross factor".  The feet should look very clean. This step takes a while, but you can do it while watching an educational Youtube video or listening to a podcast be better utilize your time. 

4. Cut off the toenails (talons, claws) with a knife. This might require some heavy-duty chopping action. But you can do it.

And that's all there is to preparing chicken feet. There are some great tutorials and comparison photos here and here.

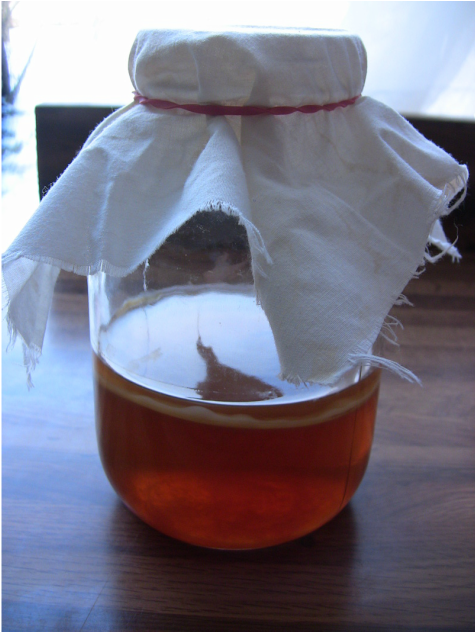
Throw the feet in the freezer, or use them right away for making stock in the pressure canner.
Picture
Mmmm... yeah.
2 Comments

Sad News

1/29/2015

1 Comment

 
If you've followed my posts for a while, you may know that I have two goats: a wether (castrated male) and a doe that was due to have babies. I was eagerly anticipating the birth of the new babies, especially on Tuesday when I noticed that her udder was starting to fill up. I checked her again later in the day, but her mucus plug had not come out so I figured the babies would be born on Wednesday.

Wednesday morning I went out early to check on her, and heard both goats crying for food, like they normally do. When I went in to feed them though, I saw that Adi had kidded sometime during the night and both kids had died. I was crushed.

It looked to me like she popped the kids out one after the other- maybe tried cleaning them off, but it appeared that the kids never got up after birth or sucked. It's possible that they were even born dead, though they looked like good full-size babies.

Ultimately some fault lay with me for naively breeding her so soon. I should have waited until November or even December to breed. In frigid January temperatures the kids hardly had a change of survival without me being there to dry them off and warm them up. In warmer weather they might have had a chance.

Anyway, that's the bad news. The good news is that Adi is doing great and now we have fresh milk. Maybe we'll have better luck kidding next time. 
1 Comment

How to Grow a Kombucha Mushroom

1/27/2015

0 Comments

 
Hey everyone! Today for Fermentation Friday I'm going to let you in on a little secret. 

When you make kombucha, the starter SCOBY, or mushroom, replicates itself much like a vinegar mother. This new mushroom baby can be given to a friend or used to start another wonderful batch of kombucha. But how on earth do you start making kombucha without a mushroom or kombucha-brewing friends??

Here's the secret: you can grow your own SCOBY with nothing but some kombucha! It takes a few weeks to grow, but it's so easy there is no reason to buy a mushroom.
Picture
My own "orphan" baby mushroom.
The picture above is some kombucha that I left sitting out, covered with cheesecloth for... three weeks now. I will probably use the new mushroom next week.

When you first start using small orphan SCOBYs, the kombucha will be a little weak. Give it some more time to grow. As anyone who has over-brewed kombucha knows, those mushrooms can get really, really big. And yes, they can still be used at that size (just peel it into smaller parts... otherwise it won't fit in the next brewing jar).

I'm not sure if store-bought 'bucha can replicate like this because I never buy kombucha. But it should, right? Somebody out there should give it a try. :)

Happy mushroom-making!
-Bethany
0 Comments

Spiegel Grove; a President's Home

1/26/2015

0 Comments

 
Picture
A couple weeks ago we went to visit family in South Carolina. 

After we decided to go, I told Hubs that we HAD to see a president's home. Because that's what road trips are all about. In light of this, I suggested that we visit the not-so-famous home of Rutherford B. Hayes, 19th president of the United States. Not familiar with Rutherford? That's okay- most people aren't. The estate, called Spiegel Grove, is located in the quaint town of Fremont Ohio. Beside the home there is a library/museum. You can get into either the home or the museum for $7.50, or do both for $13 per person. We opted to do both. The estate is open Tuesday-Saturday 9-5, so it's pretty easy to plan into a road trip.
Unfortunately we were only allowed to take pictures in the museum and not the home, which was unfortunate because it was so cool! My favorite part of the house was the Hayes' massive library of books, complete with a secret hiding place (??). He also had a private office complete with a tub and toilet (???). The dining room walls were graced with dead birds behind glass; primitive taxidermy, perhaps. In the late 1800's (called the 'Victorian' age) it was a popular thing to show your love of nature by killing animals and displaying them in your house. Funny, nowadays nature lovers would be appalled by that! 
Picture
Rutherford with a sweet elk horn chair given to him by the mountain man. We got to see it in person!
One thing we saw in the Hayes home was a small room that Rutherford called his "Little Smithsonian". Obviously when you're the president, people give you a ton of valuable but ultimately worthless gifts. These interesting oddities he put in his little museum. I really liked this concept and hope to incorporate it into my own home someday (like the toilet in the office...not). We all have special momentos that we keep- souvenirs from trips, awards, etc., but most of them get thrown into storage where they are never seen or appreciated. I think one's own "Little Smithsonian" could be made using something as simple as a china cabinet. Why display DISHES when there are a ton of other more interesting things that you never use? 

In addition to his Little Smithsonian, I was inspired by Rutherford's large collection of books. Not the fact that he collected them, but that he actually read them! Lucy was an avid reader as well. Back in the day, one had to be wealthy to own so many books. Now, a ton of great books are available for free online. Though a lot of them are old (thus in the public domain), the information is still relevant. Some of these books are even available on audio, or free to download on your Kindle. 
Picture
First Lady Lucy's evening gown.
One of my favorite parts of the Hayes stop has always been seeing Lucy's dresses on display at the museum. It's relatively rare to see a First Lady's clothing on display at her home, unless it is something small like gloves or a hat. Plus I just love looking at ancient clothes. :)

Do you like visiting historical sites? Why or why not?
0 Comments

Security of the Saver

1/24/2015

0 Comments

 
Picture
Do you worry about money all the time? Do you ever worry about going "over the budget"? Follow this plan and reap the benefits of Security of the Saver.

Step 1: Stop Buying Stuff

The most important decision you can make today is to stop buying stuff. Don't go crazy and starve your family- I mean stop buying new furniture, new rugs, new cars, new clothes, new books and magazines. When you've gotten that far, stop buying used furniture, used rugs, used cars, used clothes, used books and magazines. Just stop using shopping as a pastime. 

Take time to use, appreciate, and take care of the stuff that you do have. Buying stuff is what keeps you in bondage to "needing" so much money.

Step 2: Make Replacements Instead of "Cutting Back"

Look at different aspects of your current lifestyle and monitor them for efficiency and effectiveness. Most people automatically try to "cut back" when maybe they only need to replace some things. Here are some examples of replacements I have made in my own life.

1. Started reading educational books instead of novels.
2. Riding my bike for fun instead of shopping at thrift stores.
3. Using a meal plan instead of going to Kroger several times per week.
4. Quit my part time job and freed up time to save money by growing vegetables raising chickens and other frugal stuff. Not having a second car and commute was a huge savings in itself.

When someone says, "Yeah, we really need to cut back on spending," does that sound fun? Of course not! Focusing on the negative is always depressing. Instead we need to focus on replacing fun spendthrift things with fun frugal things. Spendthrift food with equally good (or better) frugal food. Spendthrift clothing with frugal clothing. Spendthrift habits (like leaving the lights on) with frugal habits (like turning the lights off).  

Long Term Frugality = Long Term Security

To the average American, more money means a better lifestyle. For me, it is more SKILLS that make a better lifestyle. As I acquire skills (and USE them, don't just sit on them!) I automatically save and/or make money, which becomes less and less of a concern in my life.

A frugal lifestyle makes me feel secure. If Hubs and I should ever run on hard times, I know that I can eat well, have fun and keep on learning new things without a lot of money. I know that my quality of life would not suffer much if we really were poor.

Does being frugal give you a sense of security or a sense of poverty? Why?

0 Comments

How To Make Hard Cheese

1/23/2015

0 Comments

 
Picture
Hey everyone! Unfortunately this is not a cheese-making blog, but if it were, I would methodically make tutorials cheese-by-cheese, starting with soft cheese (cream cheese, cottage cheese, queso blanco, etc.), then doing all the hard cheeses (cheddar, mozzarella, Parmesan) and lastly the mold-ripened cheeses (brie, blue cheese, etc.). As it is, my time is limited so I'm just going to do a one-size-fits-all hard cheese post so you get the idea. 

A Word About Homemade Cheese

The thing you must understand about homemade cheese is that it's inconsistent. A slight change in the temperature, cooking time, what kind of milk you use or even right down to what the cow ate, can all effect the flavor of your finished cheese. This being said, YOUR cheddar or havarti might have similar characteristics but will definitely not be exactly like the store-bought variety. By the time you're done, it may taste like a different kind of cheese. In which case you can call tell everyone that it is your new "house specialty".

The inconsistency of homemade cheese is why I prefer to use an "eyeball-it" approach rather than a methodical, scientific perfectionist approach. Cheese is cheese, and for my purposes, "messing up" a recipe or altering a recipe for convenience's sake won't hurt. If I were to sell or market the cheese that would be a different story, but neither Hubs or I care what kind of cheese we eat on a day-to-day basis.

Where To Start

Below are some basic steps involved in making hard cheese, as well as ingredients and tools required. I think you will be surprised at how easy it is. I believe the cheese I made in the pictures was Colby.

Picture
Ingredients
This is what I have in my cheesemaking toolbox:

Stored in the freezer: 
-Thermophilic, Mesophilic, and Italian starter cultures 
-Proprionic shermanii (swiss cheese) bacteria [optional]
-Bacteria linens (red mold starter for Muenster, etc.) [optional]

While the last two cultures aren't must-haves, at least get yourself a good thermophilic and mesophilic starter. Your starter will come in flakes or powder form.

Stored in the fridge: 
-Milk 
-Vegetable rennet
-Cheese color (optional)
-Calcium chloride (optional) 

Supposedly the calcium chloride helps store-bought milk to coagulate into curds, but if you are using raw milk it's not necessary. The cheese color is also optional, but do make sure to have vegetable rennet and milk on hand. 

So there you have it; vegetable rennet, starter culture and milk will get your foot in the door when it comes to cheesemaking. There are plenty of recipes available on the internet, but a reference book can be helpful as well. I have both the old and new cheesemaking books from Rikki Carrol.

Tools:


The main tool you'll need for hard cheese is a cheese press. You can buy a cheese press from a retailer or manufacturer, or you can make your own. I have two cheese presses: one is a simple heavy-duty plastic with holes throughout, and a lid/follower. To use, you put X amount of weight (like a gallon of water) on top of the lid. This pushes down the lid and squeezes whey out of the little holes. My other press was more expensive and doesn't use weights, but instead uses a screw-style mechanism where X amount of weight = X amount of rotations on the knob. You'll see this press in my photographs. Unfortunately it was bought from a private manufacturer (actually made with PVC pipes!) so I can't give a link here.

You can also make your own press from various plans on the internet. One small cheese company here in Michigan uses modified 5 gallon buckets for presses. They simply poke holes all around the bottom part, and another 5 gallon bucket easily slides down inside the first bucket to apply pressure. Of course this company is cranking out a LOT of cheese, but you could use smaller buckets and get the same effect.

Other tools you'll need are: 
-Thermometer (candy thermometer works) 
-Pot large enough to hold milk 
-Long-bladed knife for cutting curds 
-Colander and/or cheesecloth for draining curds
-A kitchen sink large enough for your pot (to water-bath warm the curds or keep them at a stable temp, if necessary).

The Process


Step 1: Read through the recipe and pre-measure ingredients. Many times the recipe will tell you to dilute the rennet and/or coloring in 1/4 cup of water before adding it to the milk. I do this diluting right at the beginning to get it out of the way.

Picture
Clockwise from top left: rennet, coloring, calcium chloride (I think...)
Step 2: Ripening

Heat the milk to a certain temperature, then add starter culture. I usually sprinkle the flakes of starter on the surface of the milk and stir, rather than dumping it straight in and then having to de-clump it. After the specified ripening time, add coloring if desired.

Step 3: Renneting

Add the rennet by pouring it through a slotted spoon (again, we don't want "clumps"). Stir in an up-and-down motion to distribute the rennet evenly. Wait the specified time until a big, wet curd has formed!
Picture
Cut curd.
Use your long-bladed knife to cut the curd into specified sizes. A common size is 1/2" or 1/4" cubes.

Step 4: Cooking the Curds

After the curds are cut, you will have to heat them to a certain temperature while gently stirring. Generally the instructions say to heat slowly; no more than 2 degrees per minute. 

Step 5: Draining the Curds

Use a cheesecloth-lined colander (or just a colander) to drain the whey off of your curds.
Picture
Draining and salting curds.
Step 6: Milling and Salting

Some recipes will ask you to break the curd into small pieces; some will tell you to cut it in strips first. This is called milling. After the milling is done, sprinkle the specified amount of salt over the curds and mix it in well. There is a 'cheese salt' that you can buy, but I just use regular table salt. It works.
Picture
The cheese press at work.
Step 7: Pressing 

Now you get to use the cheese press! Dump your curds into the press (some recipes line the press with cheesecloth) and apply the proper amount of pressure.

Step 8: Drying

Before storage, you'll want to dry the cheese for a couple days. This can be tricky. In my early cheese-making days I used a real cheese drying mat, but the darn thing molded. Now I dry my cheese in the oven (turned off!) where there is little humidity. The gas pilot light keeps it warm enough in there. Putting the cheese on a bread cooling rack allows air to circulate, though turning the cheese once a day or so is still recommended.
Picture
Step 9: Storage

The best way to store my cheese, I've figured out, is to vacuum seal it. As with many other fermented products, AIR IS THE ENEMY!!! It causes mold. I've tried waxing, oiling, spraying with vinegar, ziplock bags, salt, you name it, but vacuum sealing keeps the mold away best, by far. I'd highly recommend investing in a vacuum sealer. It is heartbreaking to spend hours on a cheese, then bring it out to enjoy 2 -3 months later and find it totally infested with mold and/or bugs.

After sealing, label the cheese with the name and date. Even though it is sealed, the cheese is still susceptible to mice and other pests, so I store mine in a plastic box with a lid- a.k.a. The Cheese Box. Supposedly raw milk cheese should be aged at least 6 months for safety reasons, but the longer you store, the stronger the cheese gets. I think the best flavor comes from a 1-3 month aging time (regardless of safety... do this at your own risk!). With the vacuum seal there is still a tiny bit of mold, but it is easily wiped and/or cut off. 

Is cheesemaking a frugal skill?

The answer is: it depends. If you are buying extra milk from the store to make cheese, the answer is usually no. It costs $3-4 to make a pound of cheese, but you can buy it for $2-3 a pound in many cases. If you insist on eating an expensive variety like Gruyere, though, it's definitely a bargain to make it yourself.

Many families I know make cheese when, for some reason, they have a large amount of extra milk that must be used before it goes bad. If you own a milking goat or cow, you may also have a lot of extra cheap or free milk that can be used. In this case, cheesemaking IS frugal. 

Happy Cheesemaking!
-Bethany
0 Comments

Fermenting Vegetables

1/16/2015

0 Comments

 
Picture
Bethany's DIY Airlock
Today I'm going to talk about fermenting vegetables with salt. Why fermented veggies? As we've already established, fermented food is easier to digest and has more nutrients (in most cases) than raw food. Plus, who couldn't use more vegetables in their diet? I don't know about you, but I'm not a raw radish-eater. Another great benefit? Fermented veggie condiments are incredibly cheap. Thanks to some free volunteer radishes and carrots from my garden, my veggies cost around 5 cents per cup. 

This is super easy to do. You will be able to smell if you did it wrong. These fermented vegetables will be a lot like sauerkraut when they are finished. They'll have a slight sour smell and a salty taste.

The most important tip I have is to use an airlock- purchased or hobbled together as you can see I did. OR, keep a lid on your veggies and unscrew once or twice a day to let out the gasses. Whatever you do, don't just put some cheesecloth on top of it or otherwise let air get in. This will make your veggies smell really nasty.

Ingredients:
1/2 pint shredded carrots, radishes, cabbage, or other vegetable
1-3 tsp. salt

Instructions:
1. Shred or mash up your vegetables. So far I have only used this salt-fermentation method on carrots and radishes, but I've heard it works great for cabbages too. You may notice that a pool of juice forms on your cutting surface. SAVE THE JUJICE! Resist the urge to drain off your vegetables, as the juice is very important for preventing mold. The more juice you have, the longer your veggies will last in the fridge. 

2. Stir in some salt. I use 1-3 tsp. per half-pint jar of veggies- more to be on the safe end.

3. Put the veggie-salt mixture in a glass half-pint canning jar. Compact the vegetables down until they are covered in their own liquid. Any veggies above the 'juice line' will have the ability to mold.

4. Screw on the lid/airlock and let sit for 3-4 days. When sufficiently sour (to your taste), refrigerate.

I use yummy fermented radishes as a condiment. So far I have not gotten Hubs to eat any, unless I sneak them into his stir fry. Muahahaha.
0 Comments

Fermentation Friday: Kombucha

1/9/2015

0 Comments

 
Picture
Kombucha, a fermented sweet tea, is full of antioxidants and a great replacement for soda pop if you are trying to kick that habit. It is SO easy to make. The only special ingredient you need is a kombucha SCOBY (a "mushroom" of certain bacteria and yeasts). You can buy these online, or get a baby SCOBY from a kombucha-making friend.

Ingredients:
1 gallon water
4 bags green tea
4 bags black tea
1 1/4 cups white sugar
1 kombucha SCOBY

Directions:
1. Boil water.
2. Add sugar, stirring til dissolved. Turn off heat.
3. Add tea bags and let steep at least 10 minutes.
4. Remove tea bags and let tea cool to room temperature.
5. Transfer to glass jar and add SCOBY. Cover. 
6. Let ferment 7 days.
7. Remove SCOBY, strain any floaters.
8. Refrigerate and enjoy! 

Notes: It's best not to let the SCOBY or fermented kombucha come into contact with metal, so use a glass fermenting container. I do use a metal spoon to test the kombucha before I put it in the fridge- this doesn't affect the taste and I think such minimal exposure is okay. It's also okay to use a metal spoon for stirring the sugar and water, before it comes into contact with the mushroom. 

I tend to be lazy/forgetful, so I just leave the teabags in until the water cools, combining steps 3 and 4.

If mold is growing on your mushroom, DO NOT DRINK THE KOMBUCHA. I've never had mold in my four years of brewing though, so it's fairly uncommon.

If there are any fruit flies in your brewing kombucha, dump it out and start over. It probably won't kill you yo drink it, but who likes drinking maggots? Not me. This actually did happen to me one time, which was disappointing but not the end of the world.

After a few cycles of brewing, your 'mama' mushroom will grow a lighter-colored, fresher-looking 'baby'. If you want, you can discard the mother and use the baby, or you can keep using the mother and also use the baby to make two batches simultaneously (which you will need to do if other people in the family get addicted to this wonderful stuff!).

Store mushrooms (covered with kombucha tea) in a pint-sized mason jar with plastic lid, in the refrigerator. They will keep this way for a long time. Supposedly you're supposed to "feed" the mushroom with sugar every so often, but I never do. I use my mushrooms again before they loose their yeasty properties.

Making babies: If you let a glass of kombucha sit out long enough, it will form a little baby of its own! I think this is pretty cool.

Adding flavor: A lot of people (myself included) add fruit, ginger, or other flavorings to the fermented or fermenting tea. My favorite thing to do is throw a handful of blueberries into the jar before it goes in the fridge. After a day or two, the flavor of the blueberries permeates the kombucha for a wonderful flavor fusion.

Using over-fermented 'bucha: Sometime you might forget about a batch of kombucha and let it ferment for too long. It will taste like vinegar. This is okay though, because it can be used exactly like vinegar for marinating and other purposes. Or, you can steep some fruit in it and call it a "shrub". Yummy.

Happy brewing!
-Bethany
0 Comments

Economics of Sewing

1/5/2015

2 Comments

 
Picture
Once upon a time, I was at the thrift store buying some vintage sewing patterns. The cashier asked me if I sewed, and then commented about how it was a dying skill that all of our grandmothers used to know. You know, back in the good old days.

Contrary to the cashier's assumption, there are many ladies today that still sew. However, I think sewing has become more of a "designer handbag" hobby rather than a frugal skill.

Do you think it is frugal to sew all of your own clothes? Think again. After buying the fabric at $3-$15 per yard, with several yards required for a dress, you're paying just as much, if not MORE, than you would at Walmart (or garage sale or thrift store) for a similar item. And that's not counting the hours you spent putting the garment together. If you figure in the initial cost of a sewing machine, miscellaneous notions and the time spent learning how to sew, the cost is even higher.

This is a distressing idea, and probably one reason why most potential sewers quit after a pair of pajama pants. Why spend time and money to make a sloppy-looking, ill--fitting piece of clothing? However, there is hope. After spending a lot of money on supplies and a lot of time sewing and learning how to sew, I've got some tips for you on how to make sewing pay off.

1. Get a sewing machine that is not something fancy. An old (possibly free) machine from the 1980s will be fine for beginners if it works properly.

2. Learn to sew with dolls. Really. (If you feel like you are too old for this, skip to #3.) I spent my tween and early teen years making dolls and doll clothes. I was able to make everything with sheets and scraps, and could make something with "fancy" (slippery, hard-to-work-with material) fabric and only buy 1/8 yard. I didn't realize it at the time, but I was learning to modify patterns and solidifying my skills with the sewing machine. Unlike my friends who had to buy expensive American Girl dolls and clothes, I was able to make anything I wanted for my dolls, for free! After the fun of playing with dolls had passed, I still made clothes because the fun of designing outfits was so addicting.

3. Learn to sew by taking apart old, free clothing. If you want to make skirts, find a skirt and take it apart, stitch by stitch, with a seam ripper. Then iron out all of the parts. The parts- what you will see on a pattern- look a lot different than the skirt when it has been put together. Take note of the hem (bottom of pants, skirt, or dress). How wide is it? How many times has it been folded under? What is the seam allowance for the piece of clothing? After you have taken it apart and ironed the pieces, save any buttons, zippers, elastic or other notions. Set aside the fabric for use in other projects. Better yet, try to put the whole thing back together.

By utilizing tips #1, #2 and #3, you will learn to sew and simultaneously build a supply of sewing notions and/or fabric for cheap (or even free!). At the learning stage, there is no reason to buy fabric. If you do find a need for large piece of fabric, an old bed sheet from a thrift store will work just fine until you are ready to make something wearable. Believe me, you probably will not want to wear your first creations in public (thus my mention of the dolls...).

4. Start with easy patterns. Princess line dresses, A-line skirts, or simple T-shirts will be easy but still flattering and wearable. If you are not going to wear your project, please don't spend money on fabric.

5. Use large garments to make small ones. When I made my wedding dress, I started with a dress from Goodwill that was several sizes too big. It had enough extra fabric for me to make an entirely new bodice.

6. If you want new fabric, buy online. Find what you want at Joann's or another fabric store, take note of what it is (satin, crepe, cotton, etc.) and find something similar and less expensive online. It is a bit of a gamble to buy fabric without touching or seeing it in person, but worth the savings if you aren't too picky.  

So now you know how to sew, and you've done it fairly cheaply. But how can sewing save you money?

7. Do alterations on ready-made clothing. Oftentimes, a piece of clothing would be perfect, if only it were shorter or had a panel in front, or didn't have a tear in the side. One of my best pair of jeans was picked out of a garage sale free-box... with no button in front. It took all of 10 minutes to make that otherwise perfect pair of name-brand jeans wearable again.

8. Make costumes. Costumes tend to cost WAY more than regular clothing. If you are involved in theatre, reenacting or halloween, there are definitely big bucks to be saved by sewing your own costumes.

9. Make formal wear. Another expensive, comparatively over-priced garment is the formal prom or bridal/bridesmaid dress. These kind of garments can be tricky to make with their slippery fabrics, but definitely doable. I would recommend taking apart a cheap (possibly outdated) dress to examine the insides. Often these dresses will have several layers of support (especially if strapless) including stiff net-like material and boning, in addition to the outside fashion fabric and inside lining.

10. Make custom-fit and styled couture garments for yourself. When you've reached a skill level in which you can do anything with a piece of fabric, then you can have every DIY Sewer's Dream of making all your own clothes. But usually this advanced level isn't reached until people are busting down your door, offering to pay big bucks for your sewing expertise.

Is sewing worth it? Not if you go to Joann Fabrics and try to recreate a Walmart skirt. But if you stick to alterations, costumes, and formal wear (and source your supplies wisely), sewing can be very useful and economical. Remember, the higher your skill level, the more it pays off. So be diligent in becoming more skilled.
2 Comments

Fermentation Friday: Sprouts

1/3/2015

0 Comments

 
Picture
Before
Picture
After
Hey everyone! I'm excited to tell you about one of my new food findings.

I actually knew about sprouts a long, long time ago, and believe I may have attempted sprouting some beans. However, I had a hard time remembering to rinse the beans, so they never sprouted.

A few weeks ago, I hit the legume jackpot. Way in the back by the stinky bottle return, they had piles of beans on sale- some of them half off. I grabbed a variety of beans, along with some different kinds of rice and two bags of $0.69 lentils.

Upon arriving home, I got on the internet to look for some lentil recipes. That's when I discovered that lentils can be sprouted. Whoa! I had been looking for some cheap 'greens' to incorporate into our meal plan, and it seemed like the perfect fit. The best part? At 69 cents per pound of lentils, an entire jar of sprouts costs... wait for it.... $0.07. I think that's pretty cool.

Sprouting is pretty easy.

1. Pour 1/3 cup of lentils in a quart jar. Use cheesecloth instead of a metal lid; screw the metal ring over the cheesecloth.
2. Add 2 cups of water.
3. Let the lentils soak overnight, then pour out water.
4. Every morning, rinse the beans. After a few days they should start to germinate. Then keep rinsing daily until they are sprouted enough for your taste.
5. Store the jar of sprouted sprouts in the refrigerator.

In addition to using sprouts in salad, you can also put them on sandwiches or in stir fry. Different sprouts have different tastes though, so think twice about dumping a whole fistful of lentil sprouts in your chili (really, don't try it). Hubs commented that our lentil sprouts tasted like peas. This is wonderful for pea-friendly dishes (like stir fry), but not great for things like tacos or chili. Use your own judgement. 

Have you tried sprouting? How did it turn out?
0 Comments
    Picture

    Bethany

    Housewife, happy wife, and mama to one. :)

    Picture

    Picture
    The Housewife's Guide to Frugal Food
    How to Eat for $10.00
    ​per Week

    Picture
    The Housewife's Guide to Menu Planning
    A Weekly Menu to Save
    Time & Money
    Picture
    The Housewife's Guide to
    Frugal Fruits and Vegetables

    No Garden? No Problem!

    Watch Meals From the Bunker:

    Picture

    Check out my Youtube Channel!

    RSS Feed


    Picture
    Baby Girl's Birth Story
    Picture
    8 Cheap Ways to Eat Healthy
    Picture

    Categories

    All
    Animals
    Book Reviews
    Books
    Christmas
    Cleaning
    Clothing
    Cooking
    Couponing
    Education
    Ego
    Electricity
    Farmers Market
    Finance
    Foraging
    Frugal
    Frugal Accomplishments
    Frugality
    Garage Sales
    Gardening
    Gifts
    Grocery Budget
    Grocery Shopping
    Herbs
    History
    Hobby Farm
    Home Based Business
    Home-based Business
    Home Decorating
    Housekeeping
    Industry
    Languages
    Laundry
    Marriage
    Meal Planning
    Medicine
    Minimalist
    Network Marketing
    Organization
    Plants
    Product Reviews
    Quotes
    Recipes
    ROI
    Rv
    Sewing
    Simplicity
    Spanish
    Spending Report
    Travel

    Archives

    May 2021
    April 2021
    March 2021
    February 2021
    January 2021
    August 2020
    May 2020
    April 2020
    March 2020
    February 2020
    January 2020
    December 2019
    November 2019
    October 2019
    September 2019
    August 2019
    July 2019
    June 2019
    May 2019
    April 2019
    March 2019
    February 2019
    January 2019
    December 2018
    November 2018
    October 2018
    September 2018
    August 2018
    July 2018
    June 2018
    May 2018
    April 2018
    March 2018
    February 2018
    January 2018
    December 2017
    November 2017
    October 2017
    September 2017
    August 2017
    July 2017
    June 2017
    May 2017
    April 2017
    March 2017
    February 2017
    January 2017
    December 2016
    November 2016
    October 2016
    September 2016
    August 2016
    July 2016
    June 2016
    May 2016
    April 2016
    March 2016
    February 2016
    January 2016
    December 2015
    November 2015
    October 2015
    September 2015
    August 2015
    July 2015
    June 2015
    May 2015
    April 2015
    March 2015
    February 2015
    January 2015
    December 2014
    November 2014
    October 2014
    September 2014

    Full Disclosure & Disclaimer

    Picture
    Picture
    I get cash back for many online purchases including wedding gifts and Ebay stuff!

Powered by Create your own unique website with customizable templates.
Photos used under Creative Commons from dasWebweib, amanessinger, thewritingreader, diakosmein