Good afternoon everyone! I hope you are having a great weekend. Today I'm going to share a few tips I learned as a floral design student. These tips will help make a $10.00 or $15.00 Walmart bouquet look like it cost a lot more... just in time for Thanksgiving. :)
Supplies and Tools
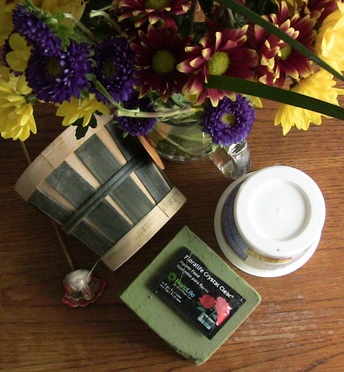
First off, you'll need some flowers. You will also use floral foam for this project. Most people just re-cut their cheap flowers and pop them in a vase. This looks okay (I mean, how can flowers look bad?) but it won't look professional. Professional-looking vase arrangements are much harder to do than foam arrangements. In addition to the block of foam to fit your container, you will also need an outer decorative container AND an inner waterproof container. I am using a basket-style outer container and a clean reused cottage cheese container for the inside.
When I worked at a flower shop, I learned that customers got an $8.00 discount for bringing in their own vase or container. If you are buying a professional flower arrangement at retail, a good portion of the price has to do with the container.
Supplies and Tools
First off, you'll need some flowers. You will also use floral foam for this project. Most people just re-cut their cheap flowers and pop them in a vase. This looks okay (I mean, how can flowers look bad?) but it won't look professional. Professional-looking vase arrangements are much harder to do than foam arrangements. In addition to the block of foam to fit your container, you will also need an outer decorative container AND an inner waterproof container. I am using a basket-style outer container and a clean reused cottage cheese container for the inside.
When I worked at a flower shop, I learned that customers got an $8.00 discount for bringing in their own vase or container. If you are buying a professional flower arrangement at retail, a good portion of the price has to do with the container.
 | 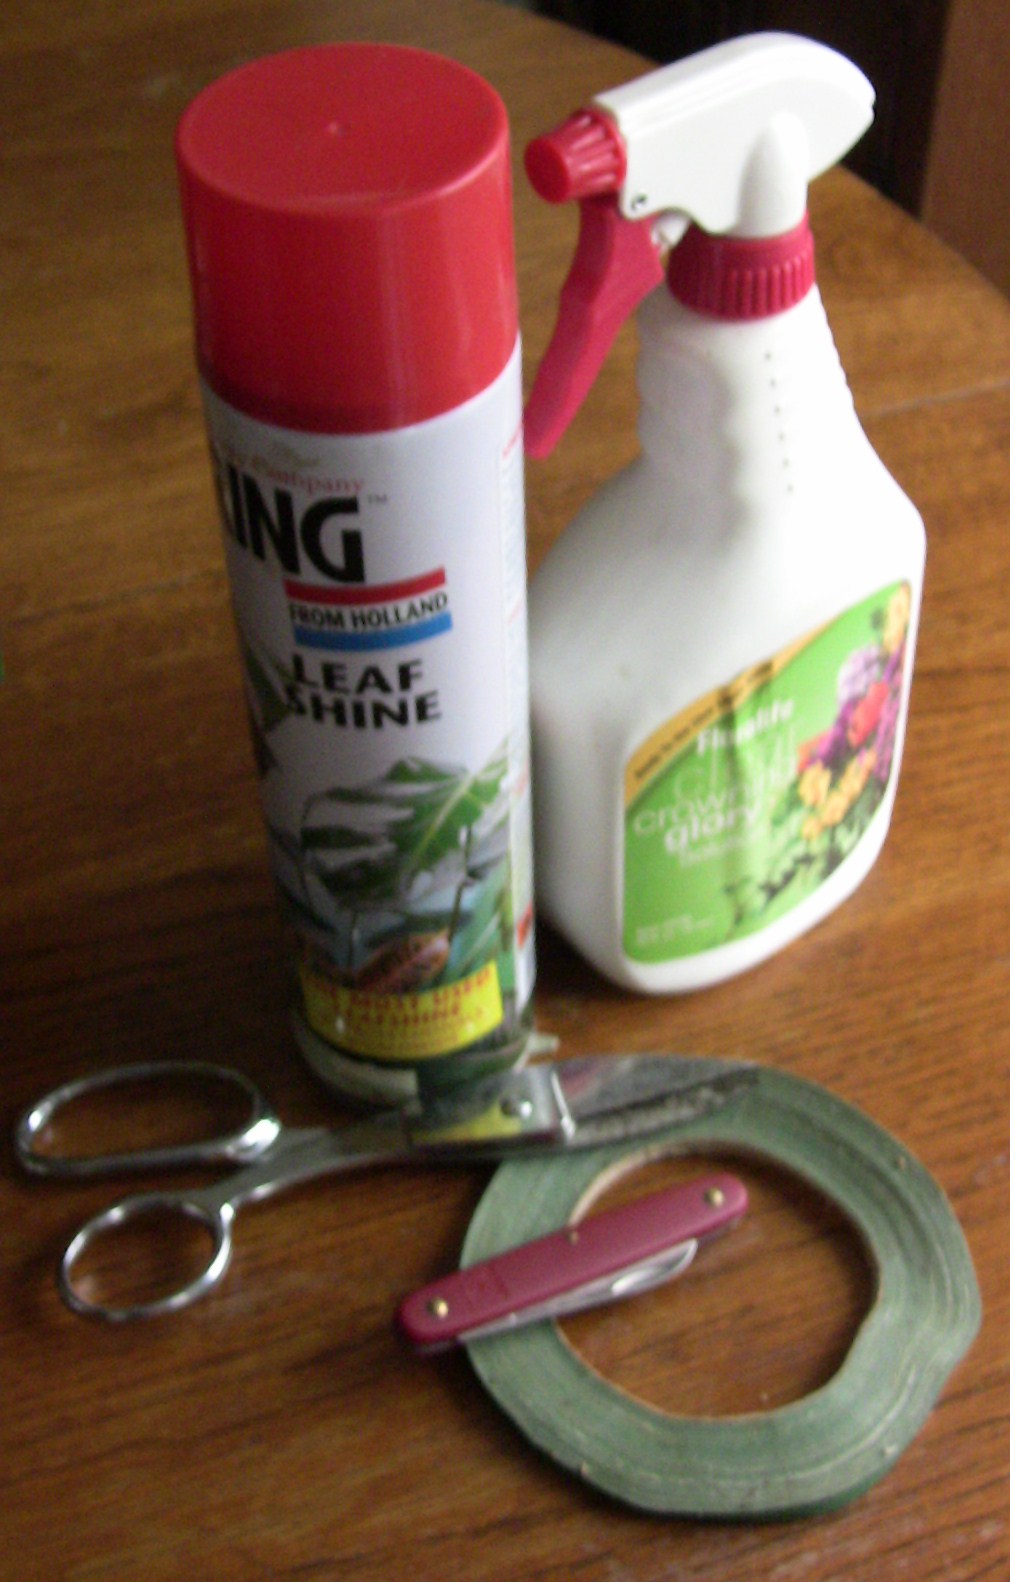 |
Tools I used for this arrangement were sturdy floral scissors, a pocket knife, and a roll of floral tape (this is sticky green tape- not the stretchy floral tape). You can use electrical tape or even a tiny bit of duct tape to replace the green floral tape.
I also used leaf shine and "crowning glory", which is a spray-on flower preservative/shine to make my arrangement last longer. Both of those things are optional, but to make your arrangement look better.
Directions
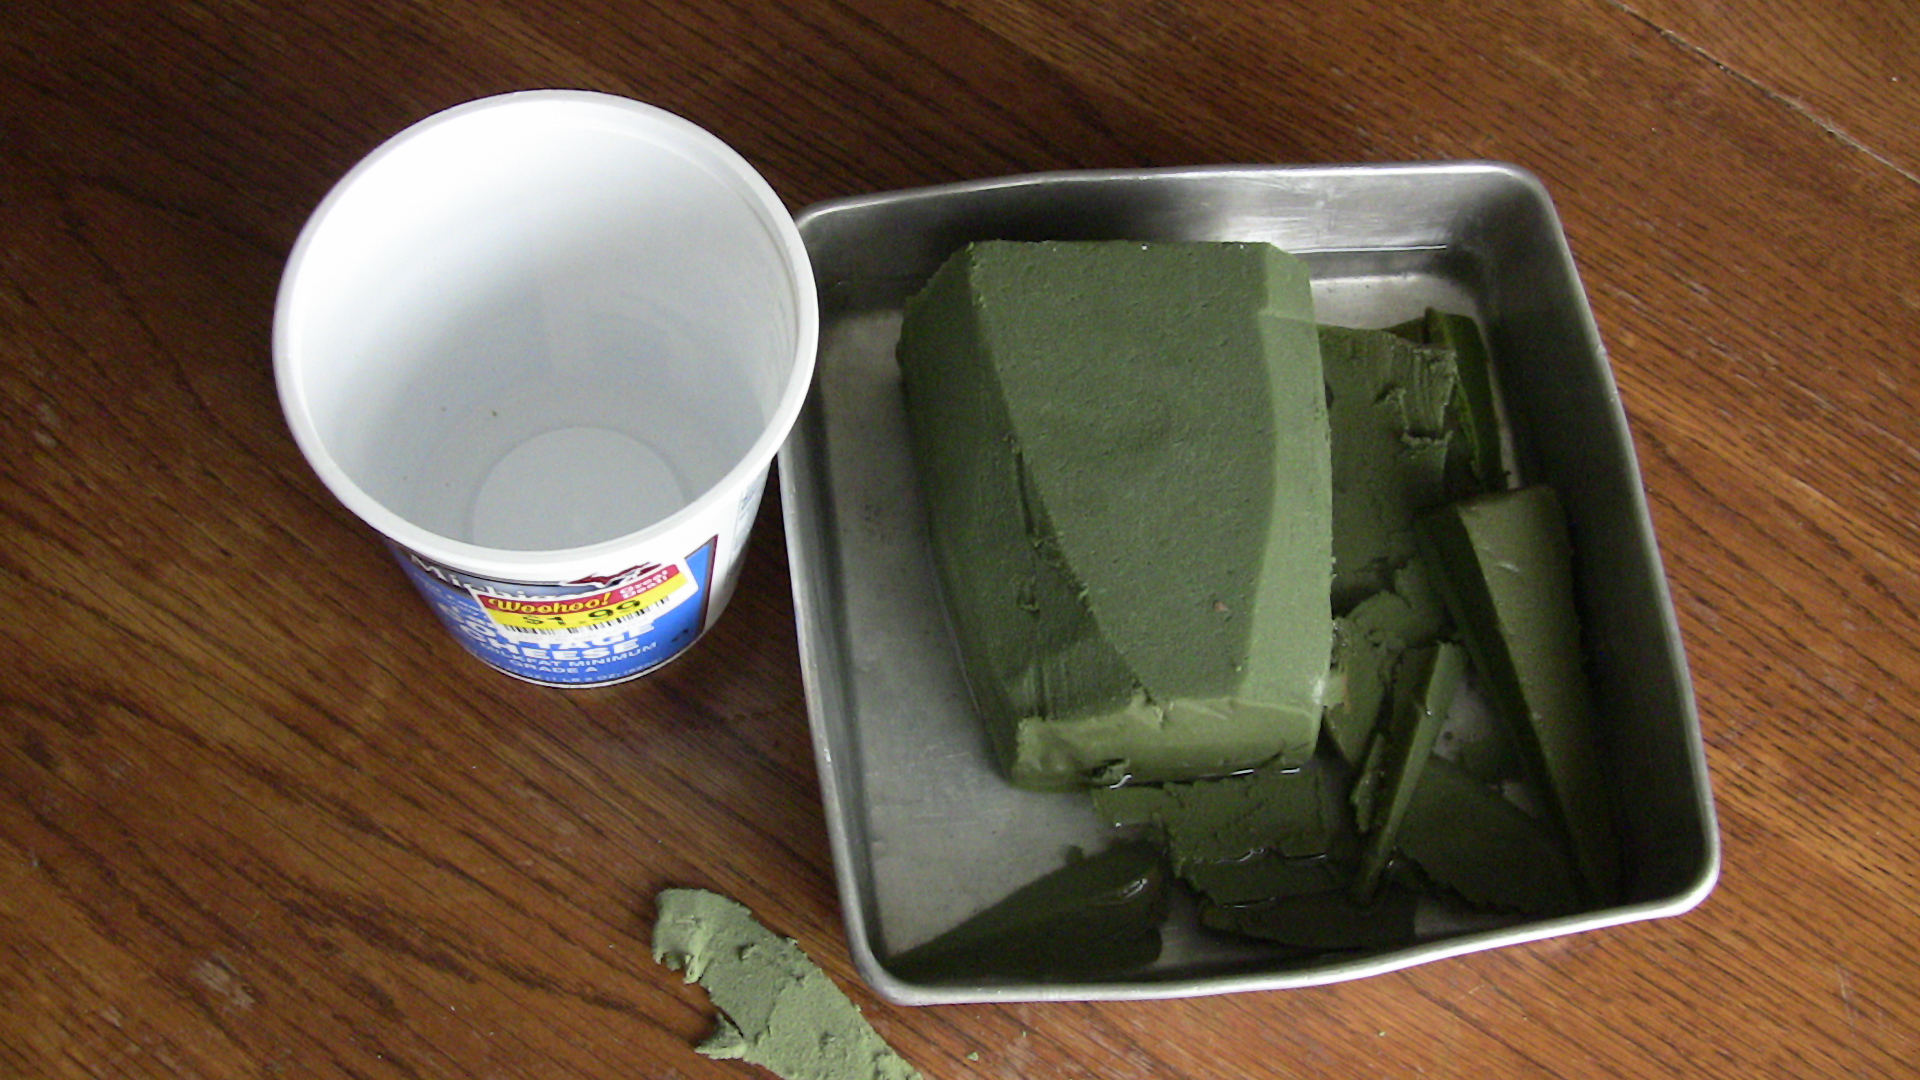
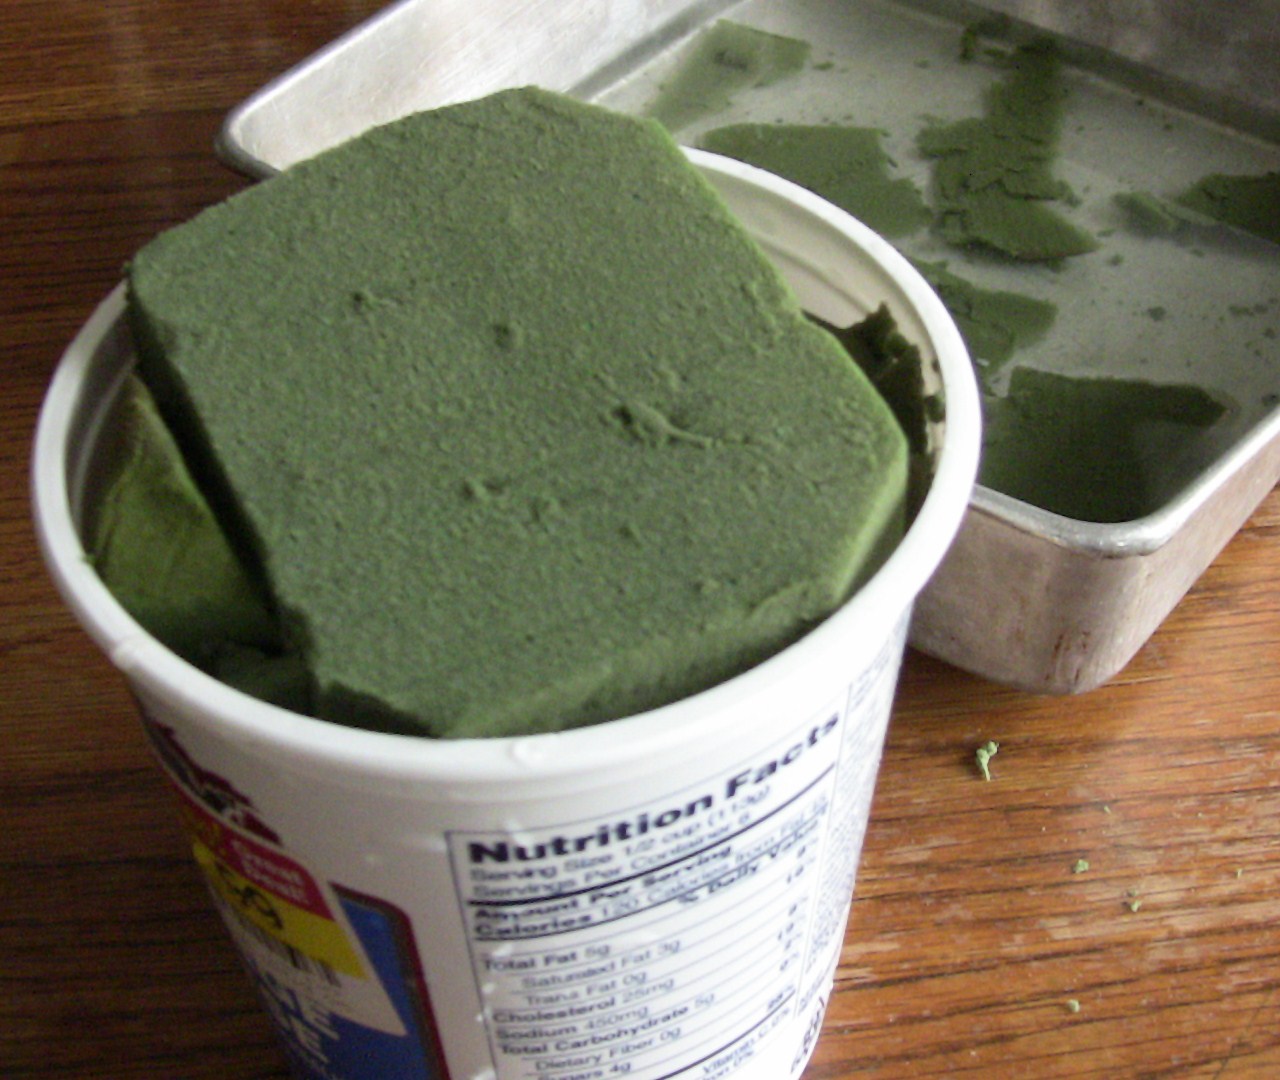
1. Cut your block of floral foam to fit the inner container. You will need to use the water-sucking foam, and not regular styrofoam.
Drop the block of foam in a container of water. Let the water soak up naturally. This may take some time, and you will want to shove the block down underneath the water to make it go faster. However, this will leave dry spots in the middle of your foam, where the flowers will need water the most. If the block has stopped "drinking" water, you can gently turn it on its side to expose dry parts to water.
Save the little bits and pieces of foam, and put them in the water, too. After you've put the large wet block of foam in your waterproof inner container, fill the nooks and crannies with those little bits and pieces.
I also used leaf shine and "crowning glory", which is a spray-on flower preservative/shine to make my arrangement last longer. Both of those things are optional, but to make your arrangement look better.
Directions
1. Cut your block of floral foam to fit the inner container. You will need to use the water-sucking foam, and not regular styrofoam.
Drop the block of foam in a container of water. Let the water soak up naturally. This may take some time, and you will want to shove the block down underneath the water to make it go faster. However, this will leave dry spots in the middle of your foam, where the flowers will need water the most. If the block has stopped "drinking" water, you can gently turn it on its side to expose dry parts to water.
Save the little bits and pieces of foam, and put them in the water, too. After you've put the large wet block of foam in your waterproof inner container, fill the nooks and crannies with those little bits and pieces.
 |  |
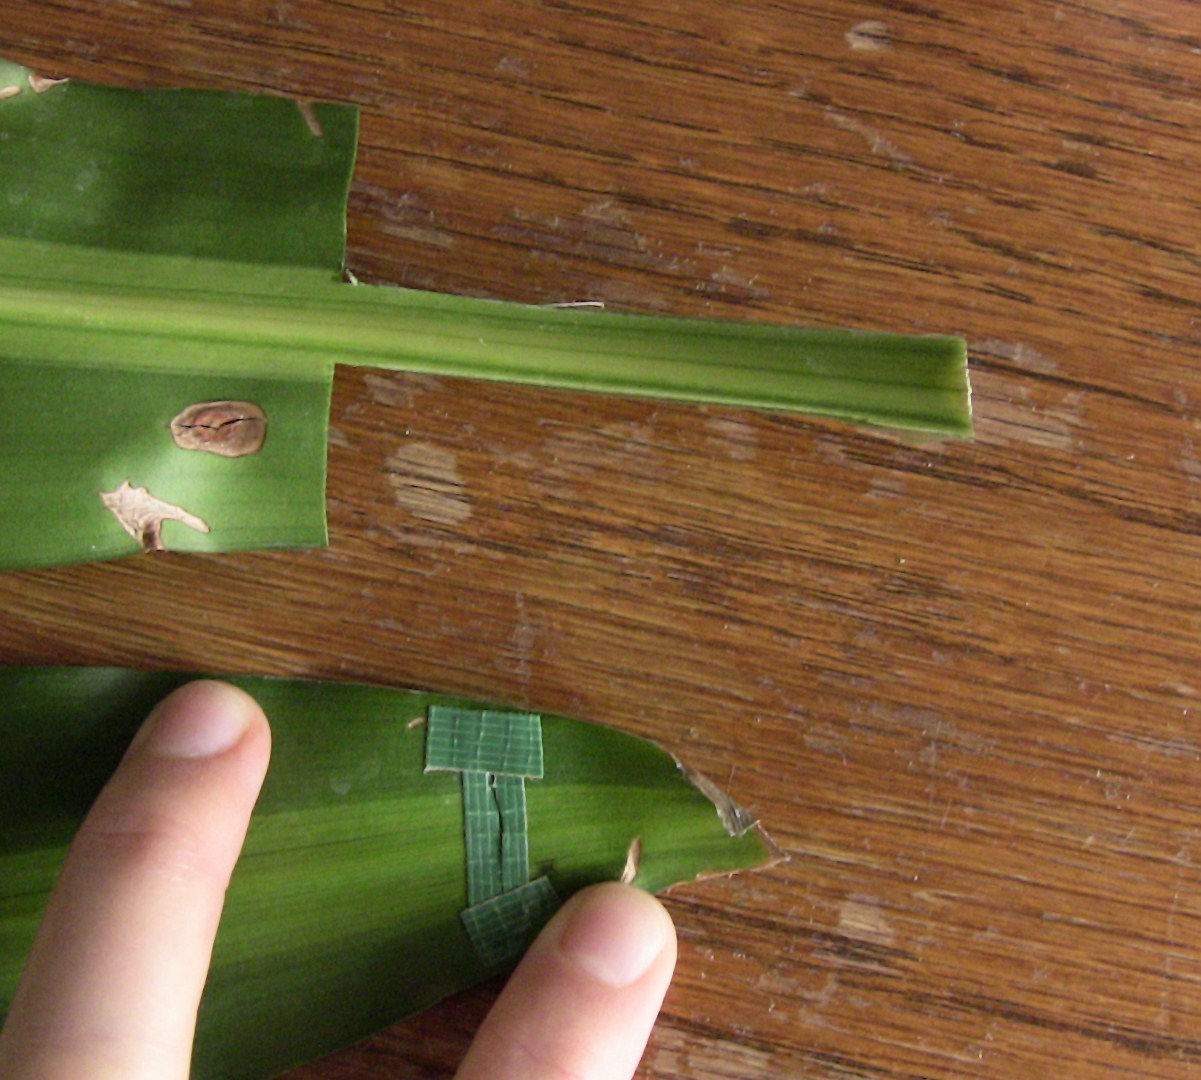
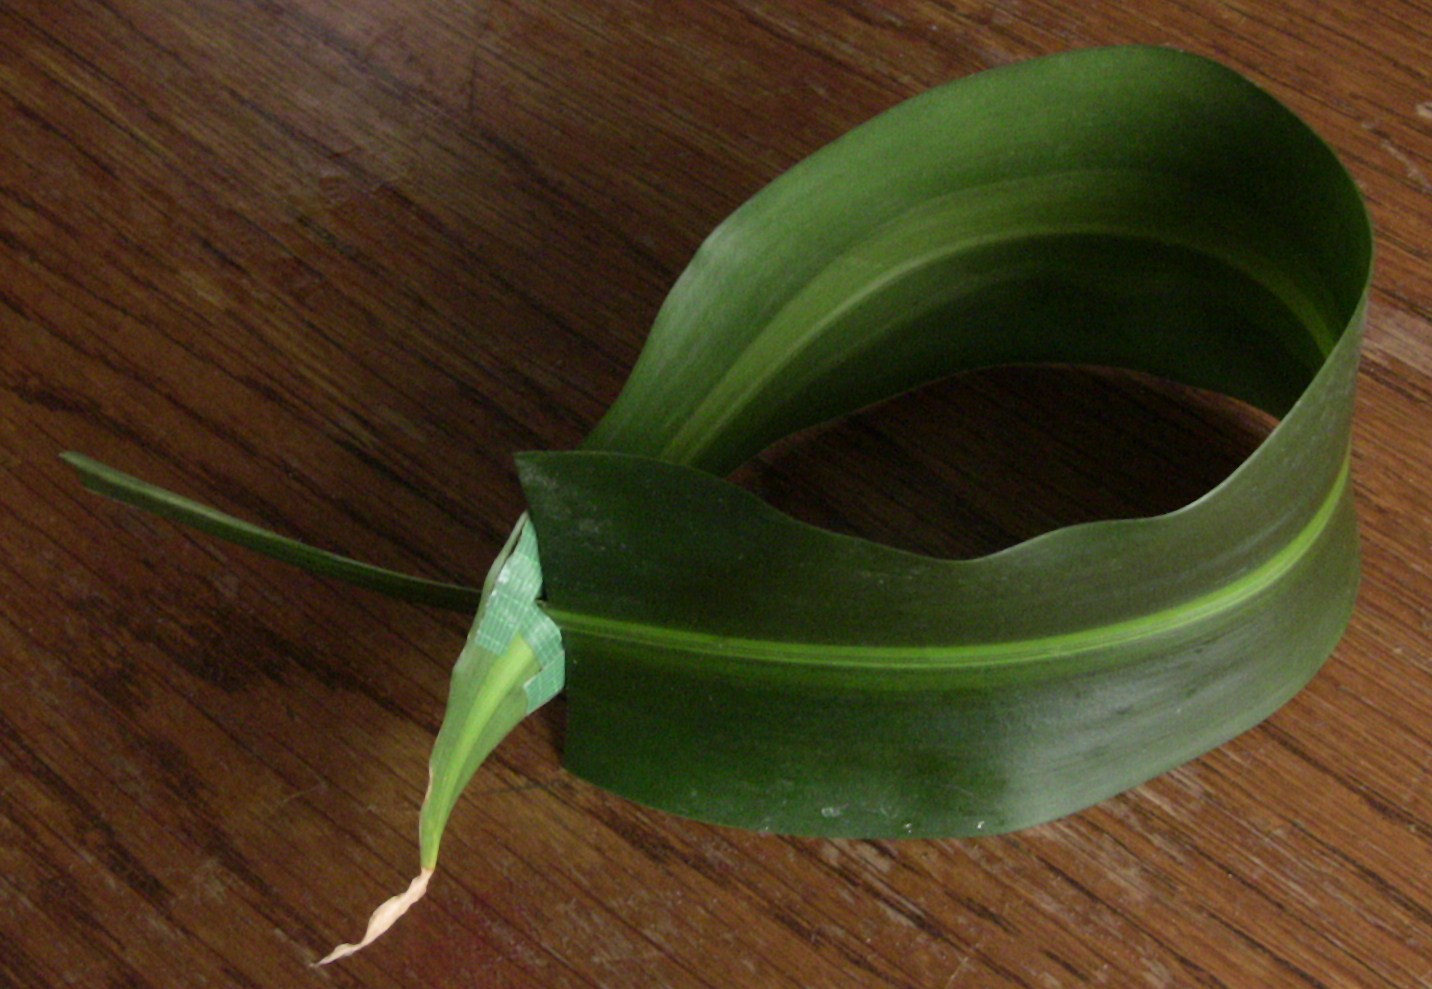
2. Next it is time to prepare the greenery. Greenery is the difference between a cheap bouquet of flowers and a real arrangement.
When buying houseplants, I carefully choose plants that can double as a source of greenery for floral arrangements. One of these houseplants is a "corn plant" that I bought at Walmart. Leaves of the corn plant are very similar to the aspidistera leaves used in real flower shops.
Below is a technique I learned when working at the flower shop. It commonly used in bridal bouquets or edging around arrangements, as well as providing fullness.
 |  |
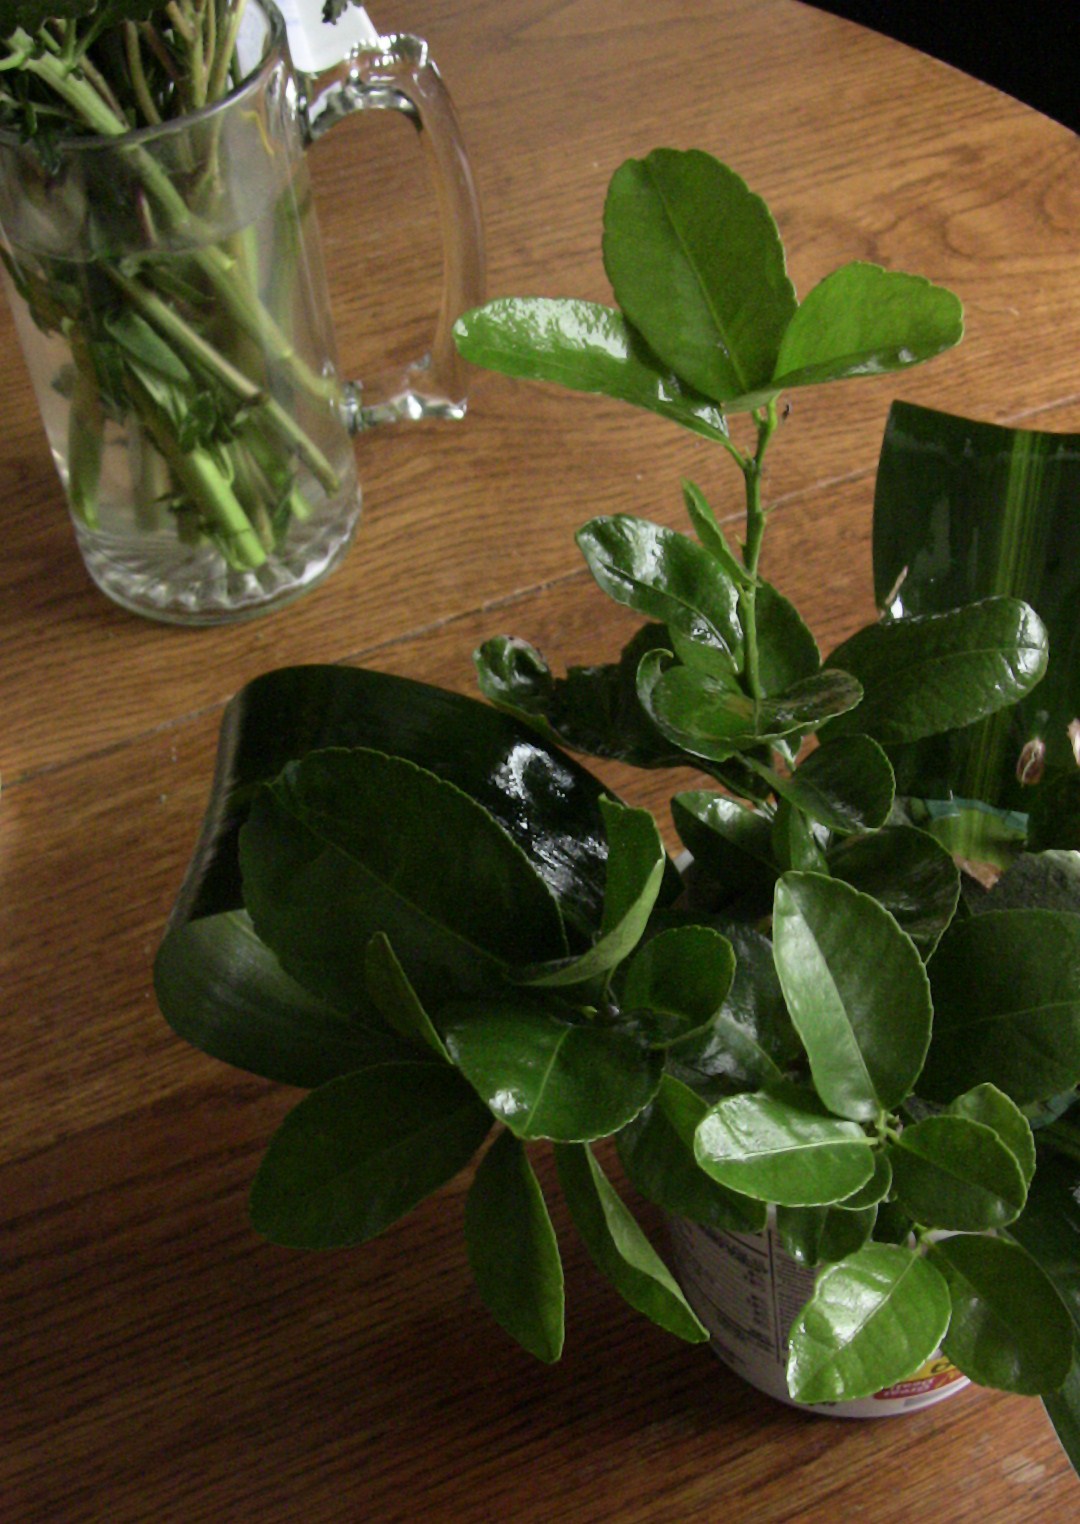
The other greenery I used for this project was orange branches. I started an orange tree from seed when I was a teenager. I have been waiting almost a decade for actual oranges, but all I get is greenery. Oh well- at least it's good for something!
Use the greenery to provide a "base" for your arrangement. I put six stems into my foam below. You want to provide decent coverage, but not too much because you will need places to poke the flowers in.
After adding the greenery, I sprayed it with leaf shine.
Use the greenery to provide a "base" for your arrangement. I put six stems into my foam below. You want to provide decent coverage, but not too much because you will need places to poke the flowers in.
After adding the greenery, I sprayed it with leaf shine.
 |  |
3. Add flowers. There really is no formula for doing this, especially if you are working with a cheap bouquet of flowers. Typically I like to work in groups of threes, but you can see that the bouquet came with four different colors of flowers. Sometimes the flowers come broken or the stems are too short. You just gotta deal with it!!
The bouquet flowers will need to be prepared. This could be a whole post in itself. I should have taken pictures of this step but I forgot to. :( Basically, you will want to strip the leaves 2" below the stem of the bottom-most flower on the branch. For this arrangement, I cut off the bottom three or four flowers (and their stems) from every branch to use as individual flowers for the bottom arrangement.
Always leave 2" of stem to poke into the foam. This will ensure that your flowers have water to drink.
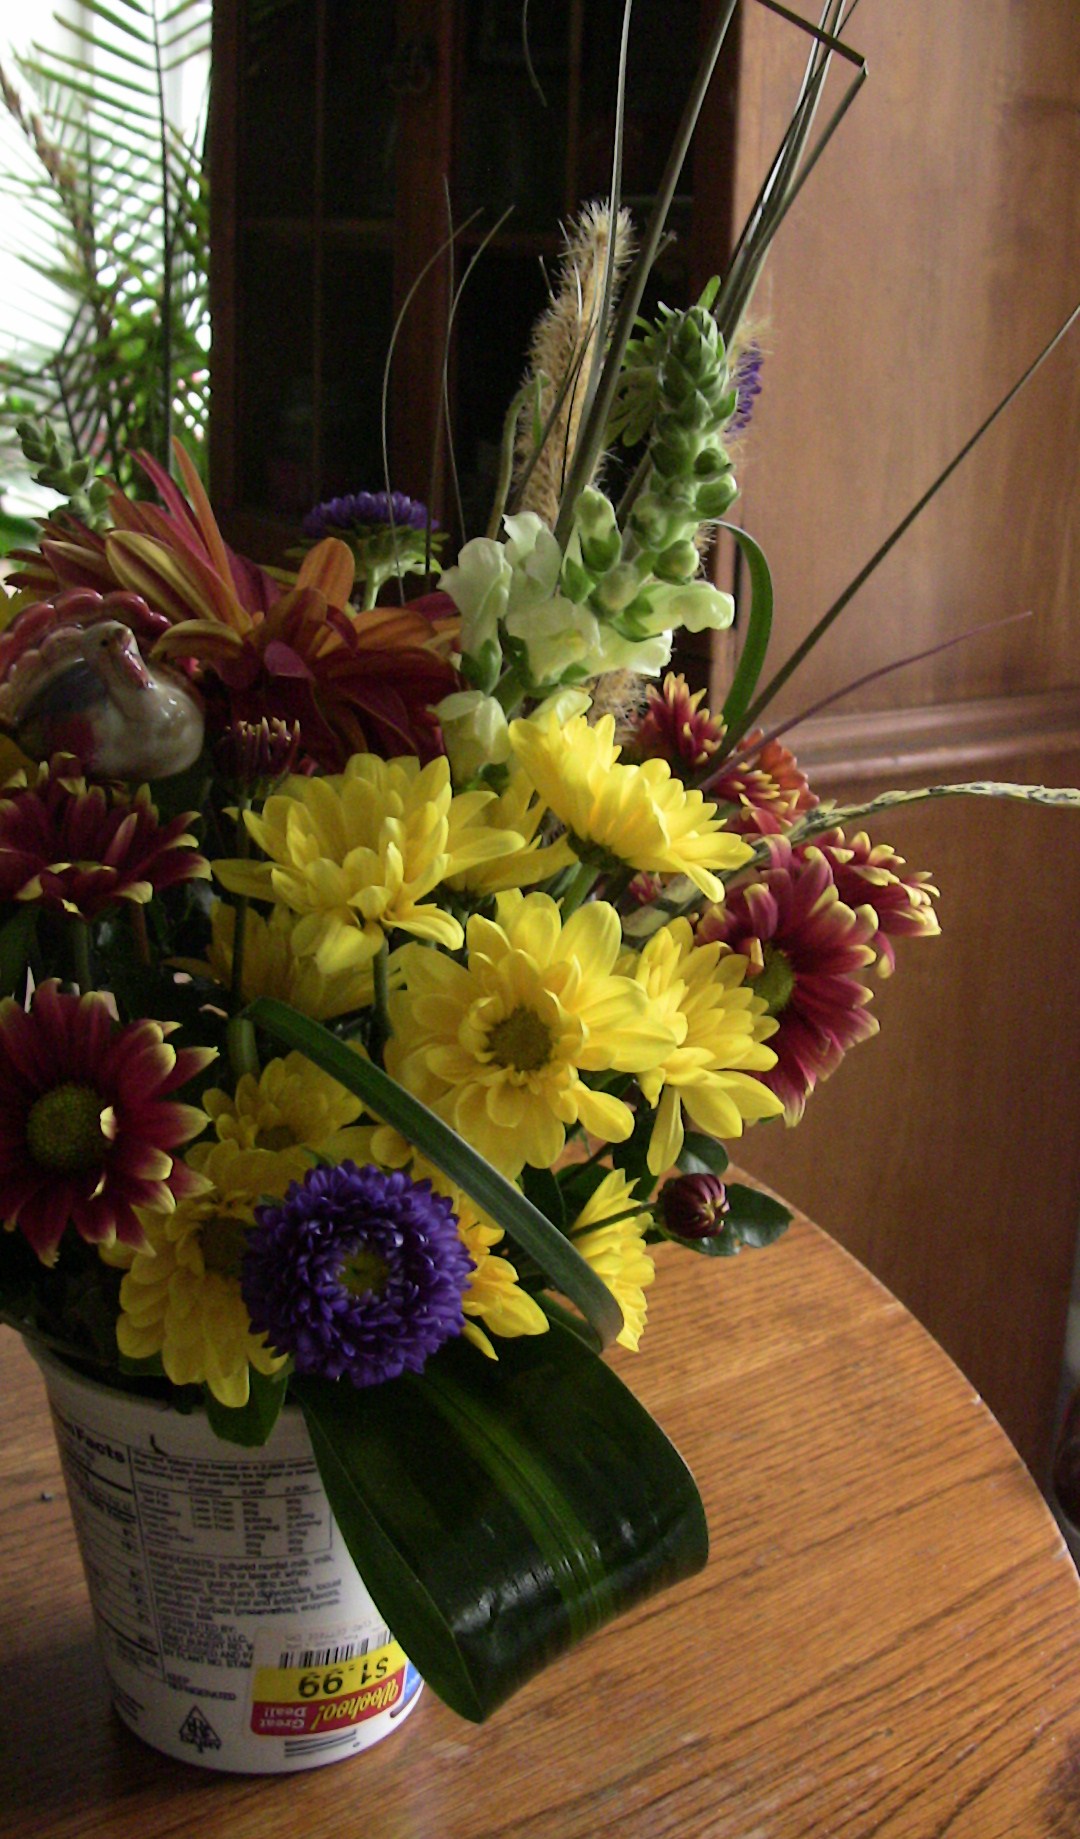
You will want a focal point for your arrangement. My focal point is where the grasses shoot out on the right side (see below). These are artificial grasses that I saved from a store-bought arrangement.
I filled in the holes with single-flower stems, ornamental grasses, and a cute ceramic turkey (mounted on a stick).
The bouquet flowers will need to be prepared. This could be a whole post in itself. I should have taken pictures of this step but I forgot to. :( Basically, you will want to strip the leaves 2" below the stem of the bottom-most flower on the branch. For this arrangement, I cut off the bottom three or four flowers (and their stems) from every branch to use as individual flowers for the bottom arrangement.
Always leave 2" of stem to poke into the foam. This will ensure that your flowers have water to drink.
You will want a focal point for your arrangement. My focal point is where the grasses shoot out on the right side (see below). These are artificial grasses that I saved from a store-bought arrangement.
I filled in the holes with single-flower stems, ornamental grasses, and a cute ceramic turkey (mounted on a stick).
 |  |
The only way to get good at floral design is to practice often. When I was a student, I made at least one arrangement every week, and a wide variety of them. You can buy some books or DVDs to help you out, but in the end there is no recipe for a perfect arrangement. You will have to feel it out. Most of the time I think my designs look terrible because I know where every gap and stray flower and lopsided part is. However, most people will not notice these small imperfections.
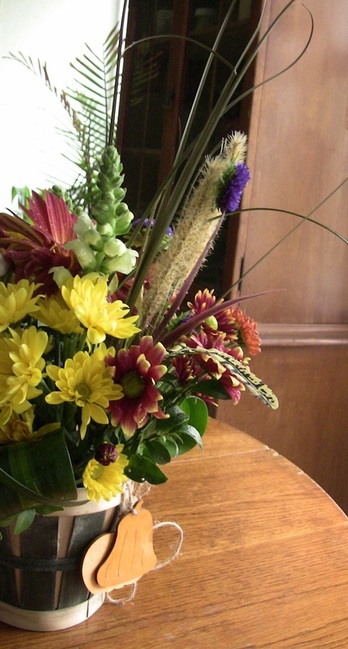
4. Set the arrangement in its final decorative container.
4. Set the arrangement in its final decorative container.
 |  |
And there you have it! A quite decent looking centerpiece for the kitchen table. You will need to replenish the water supply every few days. I use a syringe in order to avoid dumping water all over the table.
With practice (and with more tools and flowers to work with), your designs will start to look better and better. My designs aren't as nice as those from our local flower shop, but I think they are just as good as the local grocery store designs.
Additional tips:
1. Check out some library books about flower design. You can also watch free video tutorials on Youtube. More time consuming ways to learn include having a friend teach you, taking a class, or working at a flower shop (for free if you have to).
2. Invest in some supplies. Floral tape, water-soaking foam, a good pair of shears or knife, and perhaps even floral glue.
3. Use flowers and greenery that are free. Even city-dwellers can keep a houseplant around for greenery. You can also grow flowers in your garden or clip ornamental plants or tree branches around your house.
4. Dissect garage sale or purchased arrangements and salvage the supplies. Hubs buys me flowers once or twice a year, and I always save the containers and little ornamental bits to reuse.
5. Buy discount flowers. At our local Kroger, sometimes they will discount bouquets that are starting to go limp. However, many flowers in the bouquet are still good and will last another week if they are taken care of. With a little creativity and greenery, those $5.00 flowers can look like $30.00.
6. Buy live plants when they are past their prime. Kroger and Walmart mark down orchids when there aren't many blooms left. After Christmas amaryllis bulbs go on sale, and in the spring you can find forced, potted tulip and hyacinth bulbs on sale after they have dropped their flowers. In late winter sometimes you can find houseplants on sale as well. Baby these discount plants for a year or so, and you will bring them back to life. Then next season, you will have plenty of free design material!
Til next time,
-Bethany


 RSS Feed